👁️ Eye Protection — Non-Negotiable. Before anything else on this list. Safety goggles or glasses for every power tool, every grinding job, every sawing job. At 70 your eyes do not heal the way they did at 30. A chip of metal or wood at the wrong angle ends your ability to do any of this work permanently. Buy 3 pairs — one for the garage, one for the shop area, one spare. ANSI Z87.1 rated. View on Amazon →
The rule: If it requires a battery, it will eventually fail you when you need it most — and the replacement batteries may not exist in 10 years. A corded drill bought today will still work in 30 years. A 20-volt cordless bought today will be a paperweight when its battery platform gets discontinued.
The exception: Hand tools that amplify your strength rather than replace it. A ratchet screwdriver. A long breaker bar. Vise-Grips. These are force multipliers — they make reduced hand strength at 70 irrelevant.
Buy quality once. Store it dry. It will outlive you.
This page covers 39 tools. You don’t need all of them today. If you’re starting from scratch or working with a limited budget, these five handle 80% of everything a homeowner encounters — and they do it in a way that doesn’t require hand strength you may not have at 70.
All five are available used at garage sales and estate sales. All five carry lifetime guarantees. Buy these first, then work through the rest of the list as budget allows.

✓ Not a Garage Sale Person? Buy New — But Buy Right.
Some people won’t buy used tools. That is a completely reasonable position. New tools are fine. What is not fine is buying cheap new tools. The big box stores are full of house-brand sets in bright packaging with impressive-sounding names and meaningless spec sheets. The marketing is designed to make you feel like you’re getting professional quality at a bargain price. You are not.
If you are buying new, these are the brands that are actually worth the money:
Estwing — Hammers and pry bars. Buy direct or at any hardware store. Made in Belleville, Illinois. No substitute exists.
Channellock — Pliers. Made in Meadville, Pennsylvania. The name on the tool is the only one that matters for tongue-and-groove pliers.
Klein Tools — Needle-nose pliers, wire cutters, screwdrivers. Made in the USA since 1857. The electrician’s standard for 165 years.
Irwin Vise-Grip — Locking pliers. The original. Do not buy any other brand of locking pliers.
Craftsman — Wrenches, sockets, screwdrivers. Lifetime guarantee at Ace Hardware or Lowe’s. Available everywhere.
Swanson — Speed squares. Made in Frankfort, Illinois since 1925. They invented this tool. Accept no substitute.
Dewalt / Makita / Porter-Cable — Corded power tools. Any of the three. Buy corded only — see the rule above.
Wagner — Heat guns. The HT1000 and HT3500 are the homeowner standards. Reliable, repairable, widely available.
GearWrench / SK Tools — Socket sets and wrenches if Craftsman is not available. Both carry lifetime guarantees. Both made to professional standards.
The one rule for buying new: If a tool is on sale, ask yourself why. Quality hand tools do not go on sale because demand exceeds supply and the manufacturer has no reason to discount them. A Channellock wrench set at 40% off is not a deal — it is a signal. Buy at full price from the right brand, or buy used from the right brand. Those are the only two options that end well.
If you buy right, your grandchildren will still be using the tools you bought today.
Do Not Cheap Out On Your Tools

Your grandfather didn't buy his tools at a dollar store. He bought them once, took care of them, and they were still in his garage the day he died. That's the standard.
 You don't have to buy new. You just have to buy right. Garage sales. Craigslist. Facebook Marketplace. eBay. Estate sales. That's where the real tools are — Craftsman, Snap-on, Proto, Channellock, Irwin, Klein — bought by tradesmen in the 1970s and 1980s, used hard, stored dry, and still better than anything made in the last 20 years at half the price. A $3 Craftsman wrench at a garage sale will outlast a $12 import from a big box store by 30 years.
Go find them. They are out there everywhere.
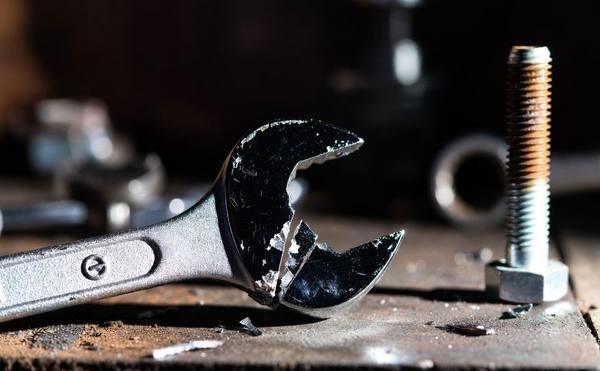
The tool community has a name for it: “Mach 5 knuckles” — when the wrench slips and your hand travels at full force into whatever is next to the bolt. Every experienced mechanic has a story. Every one of them now uses quality tools.

Facebook Marketplace and Craigslist — Search "tool lot," "garage clean out," "estate tools." An entire working man's toolbox for $50 is not unusual. Most people selling don't know what they have.
eBay — For specific tools you're hunting. Search the brand and model. Read the condition notes. Most vintage American hand tools are in fine shape — they were built to last and most of them did.
Estate sales — The best source of all. The tradesman who owned these tools cared about them. They are usually in better shape than new store tools at a fraction of the price.
Pawn shops — Underrated. Tools come in constantly. The staff rarely knows the difference between a Proto wrench and a harbor freight one. You do.
Finish — Chrome vanadium steel has a bright, even finish. Cheap steel looks dull or has a bluish tint.
Markings — Good American tools are stamped with the size and often the steel grade. If it says "Chrome Vanadium" or "CV" it's worth buying.
The fit — Put a wrench on a bolt. A good wrench fits snugly. A cheap wrench has slop — it rocks slightly. That slop is what rounds off bolts and busts knuckles.
The hinge — Open and close a pair of pliers. Good pliers move smoothly with no grinding. Cheap pliers feel rough and can gall over time.
Gripping and Holding Tools
Removing a stripped screw or bolt. When a screwdriver or wrench can’t get purchase because the head is damaged, Vise-Grips bite into the metal directly.
Clamping two pieces together while glue dries. Lock the Vise-Grip and walk away. Come back in an hour.
Turning a rusted pipe, nut, or fitting. When a wrench slides off, Vise-Grips dig in.
Emergency hose clamp. Pinch off a leaking hose temporarily while you get the right repair parts.
Turning a valve that won’t budge by hand. Water shutoffs, gas valves, anything stuck — lock the Vise-Grip and use the handles as a lever.
Grip a broken key or bolt stub. When a key snaps off in a lock, Vise-Grips are often the only tool that can get it out.
Makeshift handle on a pan or pot. Handle break off a cast iron pan? Lock a Vise-Grip to the rim.
Hold a door open or closed. Lock to the door edge and it becomes a stop.
Carry heavy wire or cable. Lock onto the end of a spool and use the handles as a carry grip.
They are not a substitute for the right wrench. Use the correct wrench when you can. Vise-Grips are for when nothing else works.
The adjustment takes practice. Set the jaw opening before locking. After a few uses it becomes automatic.
They are not pliers. Don’t use them for fine wire, delicate parts, or small terminals.
Tightening or loosening large nuts. One tool fits a 1/2” nut and a 2” nut without switching sizes.
Turning stuck jar lids and caps. The long handles multiply your grip force several times over.
Holding round stock while you cut or drill. Round pipe, rod, or dowel rolls when you try to cut it. Channellocks hold it steady.
Gripping things that have no flat surfaces. Old corroded fittings that have rounded off are no match for them.
Remove a broken light bulb base. Power off first — grip the base rim and unscrew it.
Pull cotter pins and roll pins. Grip the pin with the jaws and pull straight out.
Open stuck paint cans without a screwdriver. Grip the lid edge and use the handles as a lever.
They require hand pressure to hold. Unlike Vise-Grips, Channellocks don’t lock. For sustained gripping with limited hand strength, switch to Vise-Grips.
They can slip if not set correctly. Set the jaw snug — minimal play before it starts gripping.
Not for precision work. For small nuts in tight spaces, a box-end wrench or socket is better.
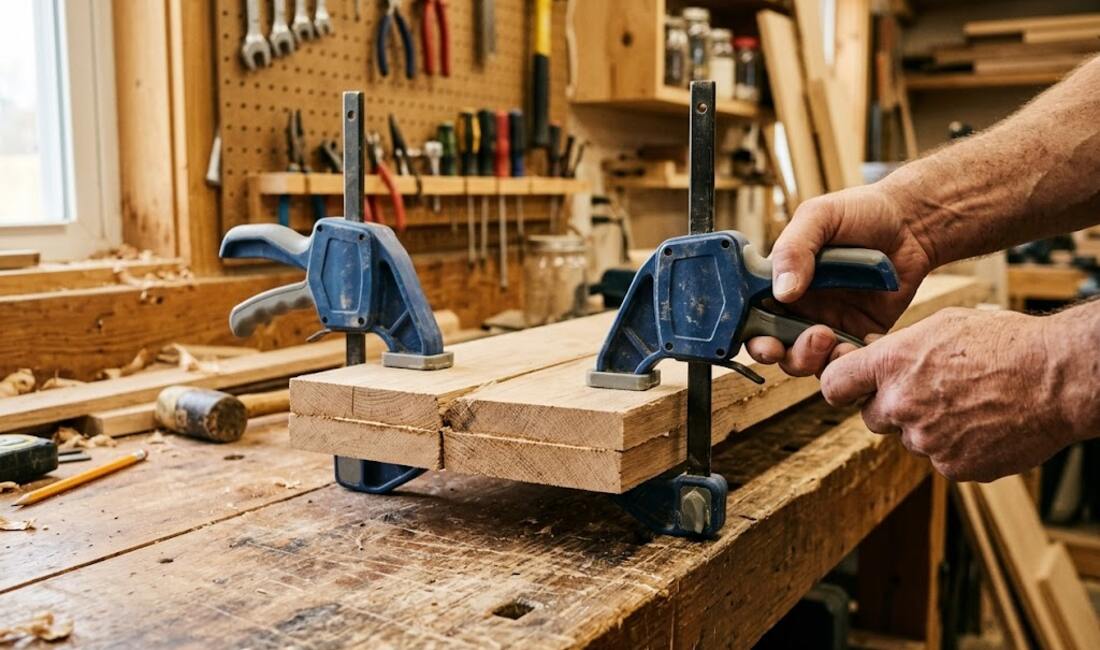
Holding work steady while you drill or cut. One hand on the drill, clamp holds the piece.
Securing a tarp or cover. During hurricane prep, faster than rope and holds better in wind.
Holding a bag, hose, or line closed. One squeeze and it’s closed.
Hold a flashlight aimed at your work. Clip to a shelf or ladder rung, close on the flashlight body. Hands-free lighting.
Keep a paint can lid sealed between coats. A spring clamp on each side presses the lid down tight.
Plastic ones break. Buy steel spring clamps with rubber-tipped jaws.
Squeezing takes hand strength. For severe arthritis, smaller sizes are more manageable.
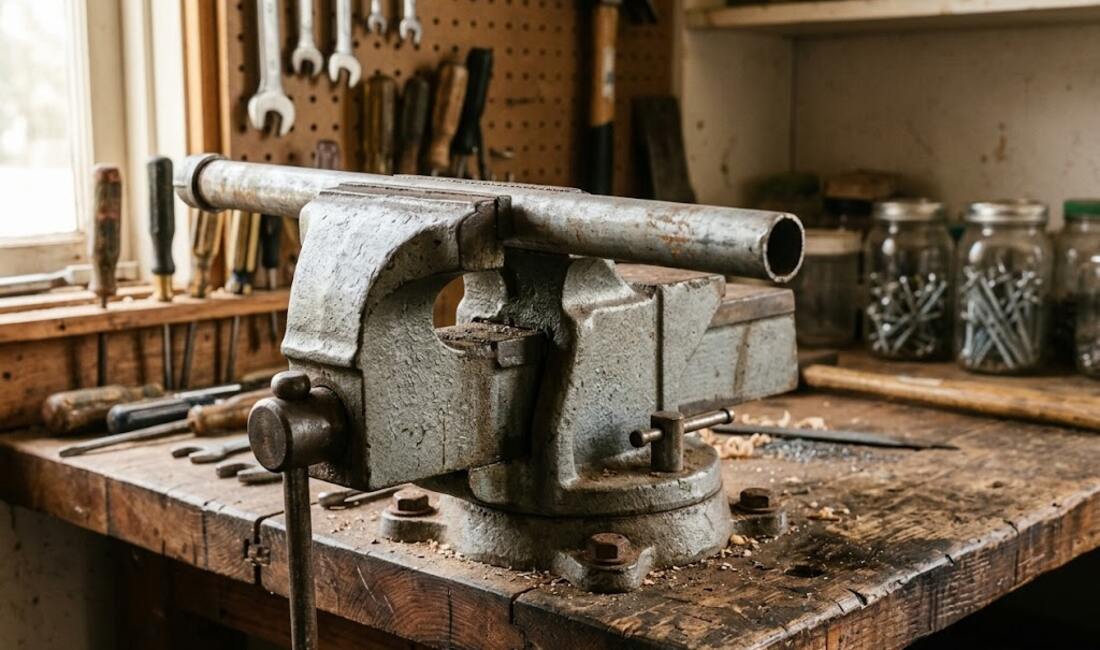
Clamping work to a bench or sawhorse. Working alone without a vise, C-clamps are your bench vise.
Holding metal while welding or grinding. Spring clamps can’t handle the heat — C-clamps can.
Emergency repair hold while adhesive cures. A C-clamp doesn’t care if the repair takes 20 minutes or 24 hours.
Compress a spring while you reassemble. Stuck valve spring, screen door closer — a C-clamp holds it compressed with both hands free.
Hold a door while you work on it. Removed a door for planing or painting? Clamp it to sawhorses.
They are slow to set and release. Use spring clamps when you need speed. Use C-clamps when you need maximum force.
Cheap ones flex under load. Buy cast iron or drop-forged steel.
Needle-nose pliers have one job better than any other tool: reach into tight spaces and grip things that your fingers can’t reach. The long tapered jaws fit into electrical boxes, behind appliances, under dashboards, and anywhere else a normal pair of pliers won’t go. The jaws also bend wire cleanly. Most also have a small wire cutter built into the base of the jaws. Klein Tools has been making these in the USA since 1857. The steel is better. The joint is tighter. They last longer.
- Reaching into electrical boxes — grabbing wire ends, pulling wire through knockouts
- Bending wire ends — making the small hook that goes under a screw terminal
- Holding small parts — nuts, bolts, cotter pins, snap rings
- Pulling wire through walls — fishing wire through conduit or wall cavities
- Removing cotter pins — the tiny bent pins that hold trailer hitches and lawn mower blades
- Gripping small bolts — when a wrench is too big and the bolt is in an odd spot
- Unclogging drains — reach past the drain stopper and pull out the hair clump
- Removing broken keys — when a key snaps off in a lock, grab the exposed stub
- Pulling heavy staples — better than a staple remover for large staples in wood or drywall
- Crimping small connectors — automotive spade connectors in a pinch
- Extracting broken screws — grip the shank of a stripped screw and back it out
- Holding soldering work — grip a small part while you apply a soldering iron
- Not for big work — the jaws will spring apart or twist under heavy load
- The wire cutter is small — light wire only. Use dedicated wire cutters for anything heavy.
- Not for prying — using them as a pry bar will spring the jaws open permanently
- Grip strength is limited — they hold, they don’t crush
8 inches is the right starting size. The Klein D203-8 is the standard — made in the USA, dip-coated handles, side cutter built in. Find them used at garage sales and estate sales. Any Klein needle-nose in good condition is worth buying at any fair price.
Diagonal wire cutters cut wire, cable, zip ties, small bolts, and cotter pins cleanly in confined spaces. The cutting edges meet at an angle — the jaws get into corners that straight scissors can’t reach. Klein makes three sizes: small (6”) for electronics and fine wire; medium (7”) for general use; large (8–9”) for heavier cable and small bolts. Klein has made these in Lincolnshire, Illinois since 1857. The steel holds an edge longer than imports.
- Cutting wire to length — electrical wire, speaker wire, antenna wire
- Cutting zip ties flush — the diagonal angle cuts right at the locking head, no sharp stub
- Removing cotter pins — cut one leg, straighten, pull
- Cutting small bolts flush — when a bolt sticks out too far
- Cutting picture hanging wire — cuts braided wire cleanly without fraying
- Removing staples from wood — slide the tip under the staple crown and cut it in half
- Cutting small springs to length — cut a coil spring to reduce tension
- Opening blister packaging — the hardened plastic clamshell that destroys scissors cuts in one move
- Precision nail trimming in tight corners — the small version reaches the corner of a fingernail or toenail that standard nail clippers can’t get to cleanly. This is a technique used by medical professionals on patients with limited dexterity — use with care and never on broken or infected skin.
- Not for hard wire — piano wire and spring steel will chip the cutting edges
- Not for live electrical wire — turn the power off first, always
- The cut leaves a diagonal face — one side will have a sharp angled point. Account for it when measuring.
- Match size to the job — forcing a small cutter on thick cable ruins the tool
Medium — 7 inch — is the right starting size. The Klein D228-7 is the standard — made in the USA, induction hardened cutting edges. Find used Kleins at garage sales. The pivot joint should move smoothly and the cutting edges should meet cleanly with no gap when closed.
Driving and Fastening Tools
A ratchet screwdriver lets the shaft spin in only one direction while the handle moves back and forth. Push forward to drive, flick the switch, push back to reset — the screw advances with every stroke without your hand ever leaving the handle. No re-gripping. For hands with arthritis or reduced grip, this is transformative. S2 steel bits are harder than standard bits — they hold their shape longer and strip screws less often. The magnetic tip holds the screw so you don’t need to balance it with your fingers. The flexible shaft bends around corners and into spaces where a straight shaft won’t go — behind panels, under dashboards, inside appliances.
- Furniture assembly — dozens of screws driven without re-gripping once
- Cabinet and door hardware — hinges, knobs, pulls in tight spaces where a drill won’t fit
- Appliance repair panels — washing machine access panels, refrigerator covers, dryer housings
- Electrical work — outlet screws, switch plate screws, junction box covers
- Any job where your hands get tired fast — the ratchet does the return stroke for you
- The flexible shaft reaches inside wall cavities — bend it around a stud to drive a screw you could never reach straight-on
- Extra leverage on seized screws — wrap your palm over the handle cap and push down while turning — adds significant axial force
- Quick-change bit driver — most ratchet sets accept standard 1/4-inch hex bits, the same bits your drill uses
- Not for high-torque work — the ratchet mechanism limits force. For large tight screws use a corded drill or impact driver.
- The flexible shaft reduces torque — use it for light screws in hard-to-reach spots, not for lag screws.
- Bit quality matters — S2 steel is specified for a reason. Don’t substitute cheap bits — they strip faster.
Look for: ratcheting handle, S2 steel bits (Phillips #1/#2/#3, flat 4mm/5mm/6mm minimum), flexible shaft extension, bit storage. Vessel, Wera, and Klein are professional grade. Any ratcheting screwdriver set with S2 bits and a flex shaft from a hardware store will serve a homeowner well for decades. Test the ratchet: it should click cleanly with no slipping in both directions.
Modern devices use miniature screws in specialty head styles that a standard screwdriver won’t touch. A 24-in-1 kit covers all of them: Phillips #000 through #1, flat 1.5mm through 4mm, Torx T4 through T15, JIS (Japanese Industrial Standard for cameras), pentalobe (Apple devices), tri-wing (Nintendo), and hex 1.5mm through 3mm. The magnetic tips hold tiny screws that would otherwise fall into the device. The slim knurled handles give control under light torque. This kit lives in the house — junk drawer, desk, nightstand — not in the garage.
- Eyeglass frame screws — the tiny hinge screw; the #000 or #00 bit fits
- Hearing aid battery doors — tiny Phillips, usually #000
- Phone screen and back panel — pentalobe for Apple, Torx for Android
- Laptop and tablet panels — Torx and small Phillips for panel screws
- Watch battery replacement — flat 1.5mm fits most watch case screws
- Small appliance repair — toasters, coffee makers, electric razors
- Tightening loose eyeglass hinges — the single most common use for anyone over 50. Takes 10 seconds.
- Opening CPAP machine housings — most use Torx T10 or T15 panel screws
- Game controller repair — PlayStation and Xbox use Torx T8 security screws
- Remote control battery contact repair — tiny flat bit bends a spring contact back into position
- Not for torque — slim handles are for precision, not force. Heavy pressure strips the screw or snaps the bit.
- Bit tips are fragile — precision bits are small. The wrong size bit strips more screws than a cheap driver.
- Easy to lose the bits — keep them in the case. Buy a kit with a magnetic storage tray, not loose bits in a bag.
Look for pentalobe, JIS, Torx (including security Torx), tri-wing, and standard Phillips and flat in precision sizes. iFixit, Wiha, and Wera make professional-grade kits. A 24-piece to 48-piece kit from any hardware or electronics store covers everything. Keep one at your desk or chair — that’s where you’ll use it most. A second kit in the car handles roadside eyeglass emergencies.
A standard screwdriver set covers the two head types that handle 95% of all screws in a home: Phillips (cross-shaped) and flat/slotted. You need three sizes of each — a #1 Phillips fits small appliance screws, a #2 fits most household hardware, and a #3 drives large screws and deck hardware. The cushion grip handle is the critical feature for older hands: the wide, soft grip lets you generate torque by twisting your palm rather than squeezing your fingers. Magnetic tips hold the screw to the bit so you don’t need to balance it while starting the thread.
- Outlet and switch plates — #2 Phillips for cover screws
- Door hinges and hardware — #2 Phillips for most residential hinges; #3 for heavy hardware
- Cabinet hinges and drawer slides — #2 Phillips almost universally
- Appliance access panels — #2 Phillips for panel screws, flat for prying up clips
- Tightening loose furniture screws — chairs, tables, bed frames
- Prying open stuck drawers and panels — the flat blade levers it open without damaging finish the way a pry bar would
- Scraping dried caulk and adhesive — the flat blade is stiff enough to scrape without flexing
- Opening paint can lids — the flat blade pries the lid without bending it
- Turning slotted faucet packing nuts — the large flat screwdriver fits old-style packing nuts inside faucet bodies
- Phillips bits cam out under heavy torque — designed to slip before stripping. For heavy driving, use a drill or impact driver.
- Flat bits slip off slotted screws — the tip must fit the slot width exactly. Too narrow and it pivots; too wide damages the slot.
- Cheap handles crack — cushion grip is not just comfort, it’s structural. Plastic without cushion grip splits under torque.
- You still need the ratcheting screwdriver — for jobs with many screws, the standard driver tires your hand. Both belong in the kit.
10-piece minimum: Phillips #1, #2, #3 and flat 3mm through 6mm plus a stubby #2 Phillips and stubby flat. The stubby handles tight spaces where a full-length driver won’t fit. Cushion grip handles are non-negotiable. Amartisan, Klein, Wiha, and Wera all make sets worth buying. Find used Craftsman, Klein, or Stanley screwdrivers at garage sales — the 1980s versions are better than new budget imports. Check the tips: no rounding, no chipping, no deformation at the point.
A socket set is the most efficient bolt-turning system ever designed. The socket fits over a bolt head or nut and grips all six sides at once. The ratchet lets you turn one direction and click backward without removing the socket from the bolt — essential for tight quarters. The breaker bar is a long handle — 18 to 24 inches — that multiplies your force through basic leverage. A bolt that resists 40 pounds of wrist force submits immediately to 40 pounds applied to an 18-inch handle. Get SAE and metric both.
- Changing oil and filters — the breaker bar breaks the drain plug loose without skinning knuckles
- Removing and installing batteries — terminal bolts and hold-down clamps
- Tightening loose outdoor furniture bolts — patio furniture, swing sets, deck railings
- Generator maintenance — spark plugs, oil drain plugs, and cover panels
- Fence and deck work — carriage bolts through lumber
- Breaker bar as a cheater pipe — slip a length of pipe over the handle for even more leverage on seized bolts
- Tapping the breaker bar with a hammer — shock loading breaks loose corroded bolts that steady pressure can’t move
- Using a socket as a punch — the right-size socket over a bearing or bushing, tapped with a hammer, drives it out cleanly
- Removing rounded bolt heads — a socket grips six sides fully; often gets purchase when a wrench has already rounded the corners
- The ratchet can slip under extreme torque — for truly stuck bolts, use the breaker bar, not the ratchet
- SAE and metric are not interchangeable — using the wrong size rounds bolt heads
- Cheap socket sets crack under load — chrome vanadium steel minimum. Craftsman, GearWrench, SK, Snap-on are reliable.
3/8-inch drive, SAE and metric, shallow and deep sockets, 3-inch and 6-inch extensions, a ratchet, and a breaker bar. A 40 to 72-piece set covers everything. Craftsman, GearWrench, and SK all carry lifetime guarantees. A used Snap-on or SK set from the 1970s is still better than most new sets sold today.
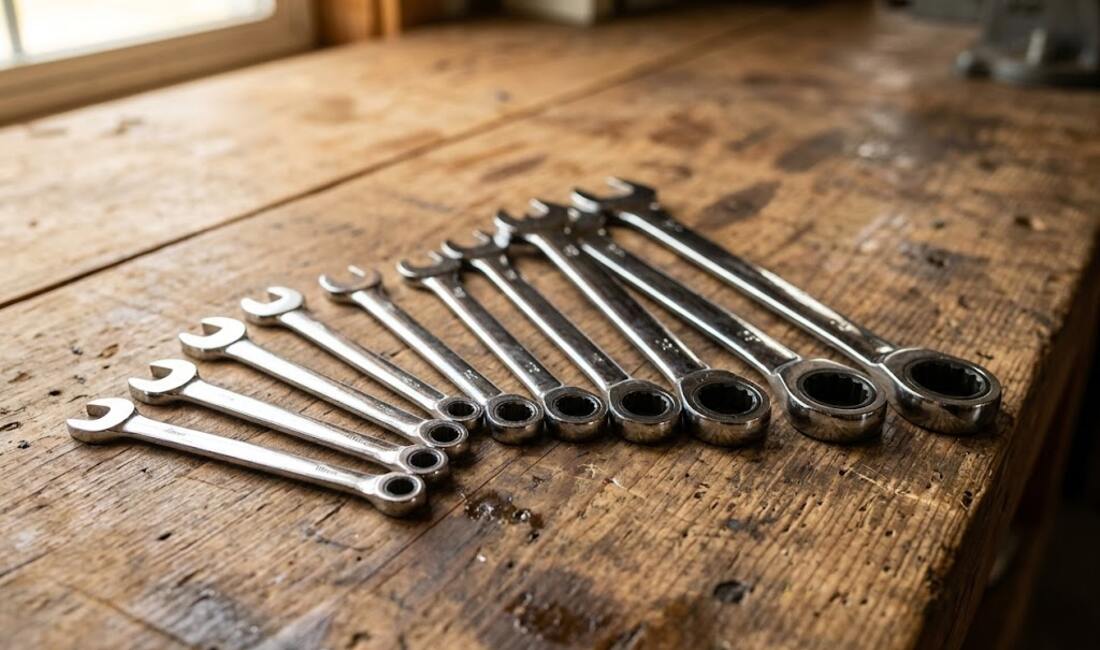
A combination wrench has an open end on one side and a closed box end on the other. The open end slips onto a bolt from the side — faster to position, works in tight spaces where you can’t slide the wrench over the bolt head. The box end surrounds all six sides of the bolt head and grips without slipping — more torque, less rounding. You use whichever end fits the situation. The combination format means one tool does both jobs. Chrome vanadium steel is the alloy standard for quality wrenches — harder than plain steel, resists rounding under torque, holds its shape over decades of use. A complete set runs from 1/4” through 1” SAE and 6mm through 22mm metric — covering every bolt you’ll encounter in a home, vehicle, or appliance.
- Tightening and loosening hex nuts and bolts — furniture hardware, appliance brackets, outdoor equipment, anything with a standard hex head
- Plumbing supply line connections — the nuts under sinks and behind toilets are almost always 3/4” or 7/8” SAE — a wrench seat them without marring the finish
- Battery terminal clamps — 10mm metric for most domestic vehicles, 8mm or 13mm for imports
- Hose clamps and fittings on generators and small engines — the open end reaches into tight engine bays where a socket won’t fit
- Tapping for extra torque — place the wrench on the bolt and tap the handle end with a hammer for the torque your hands can’t provide — the Craftsman guarantee covers the wrench even if it bends
- Holding a bolt head while you turn the nut — one wrench on the bolt, one on the nut — two wrenches from the same set
- Prying small things — the box end of a wrench is strong enough to lever small items, pop covers, and separate stuck parts when you need controlled, limited force
- Improvised hammer for soft tapping — the handle end of a heavy wrench taps pins, roll pins, and small parts into position without the damage a hammer face would cause
- Checking bolt tightness by feel — an experienced hand on a quality wrench can feel the difference between snug, tight, and overtight better than a torque wrench for household work
- Bench vise substitute — two wrenches clamped in opposite directions on a small part hold it steady while you file, drill, or solder
- Turning stuck knobs and valves — slip the open end over the stem of a stuck valve handle and use the wrench as a lever extension
- The open end rounds bolt heads under heavy torque — the open end grips only two sides. Under maximum force it can slip and round the corners. For maximum torque always use the box end or a socket.
- Fixed sizes — one wrench per bolt size — unlike adjustable pliers, a wrench only fits one size. An incomplete set leaves you stuck. Buy complete SAE and metric both.
- Slipping knuckle buster — when a wrench slips off a bolt under force, your knuckles go into whatever is next to the bolt. The box end largely eliminates this; the open end does not.
- Not for round objects — wrenches need flat sides to grip. Pipes, rods, and rounded fittings need Channellock pliers or Vise-Grips.
Buy SAE and metric both — a 14-piece SAE set (1/4” through 1”) and a 10-piece metric set (8mm through 19mm) covers everything. Craftsman is the first choice because of the lifetime guarantee — take any broken or damaged Craftsman hand tool to Ace Hardware or Lowe’s and they replace it free, no receipt, no questions, even on used tools from a garage sale. GearWrench, SK, and Proto are also lifetime guarantee. Snap-on and Mac are professional grade and expensive new — find them used. At a garage sale: look for the Craftsman name stamped on the handle, check that the box end corners are sharp and not rounded, check that the open end jaws are parallel with no spreading. Those three checks tell you everything about the tool’s condition.
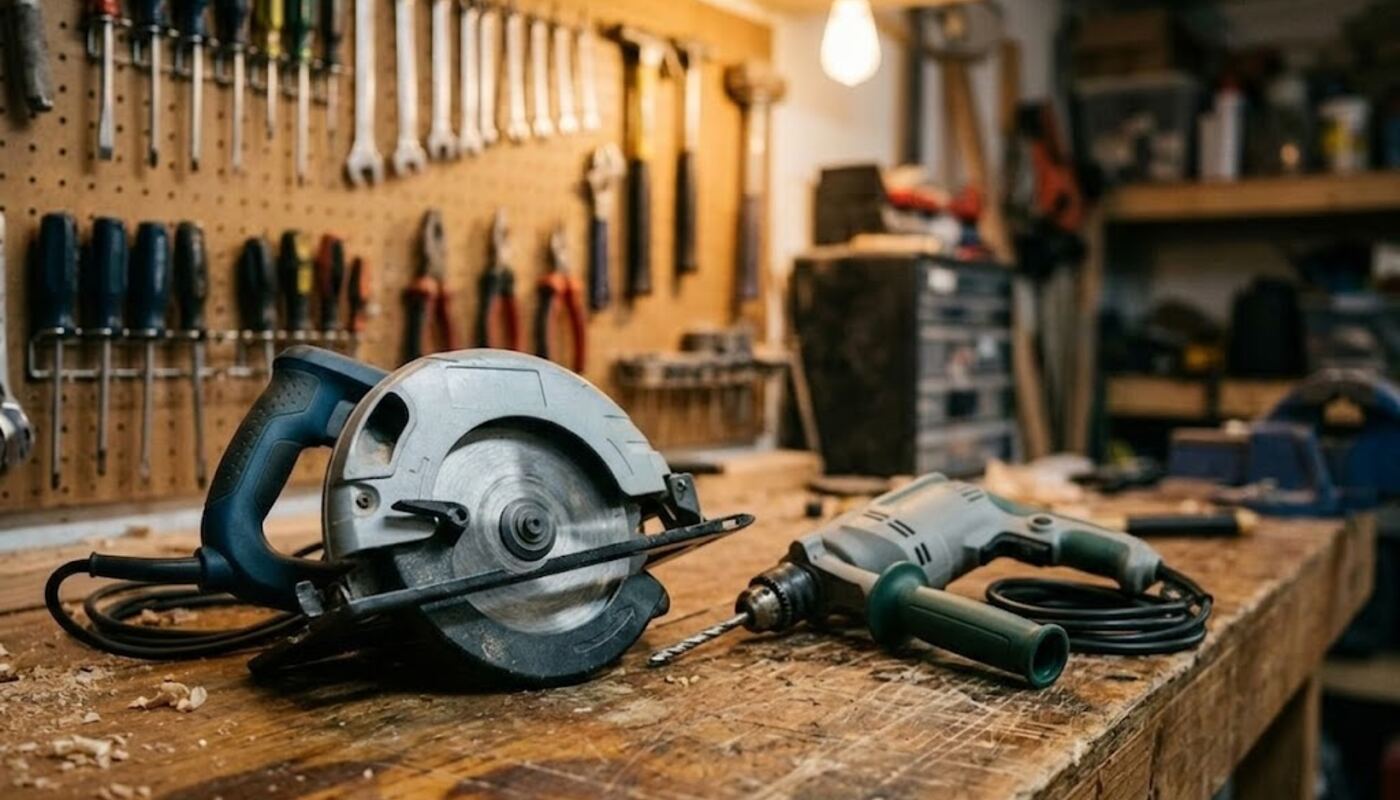
Corded Power Tools
Why corded beats cordless for longevity: A corded drill bought in 1990 still works today. An 18-volt cordless bought in 2010 is a paperweight — its battery platform has been discontinued. The tool itself is fine. The platform failed it. Every corded tool you buy is immune to this. It works as long as there is electricity.
Here is the whole philosophy of this category in one sentence: the corded tool you buy today is the same tool your grandfather used and handed down to your father — and you will be able to do the same thing. More power than any battery tool at the same price, never dead when you pick it up, and never orphaned when a manufacturer retires a battery platform. Nobody has ever inherited a battery. Corded tools are meant to last — that is not nostalgia, it is engineering.
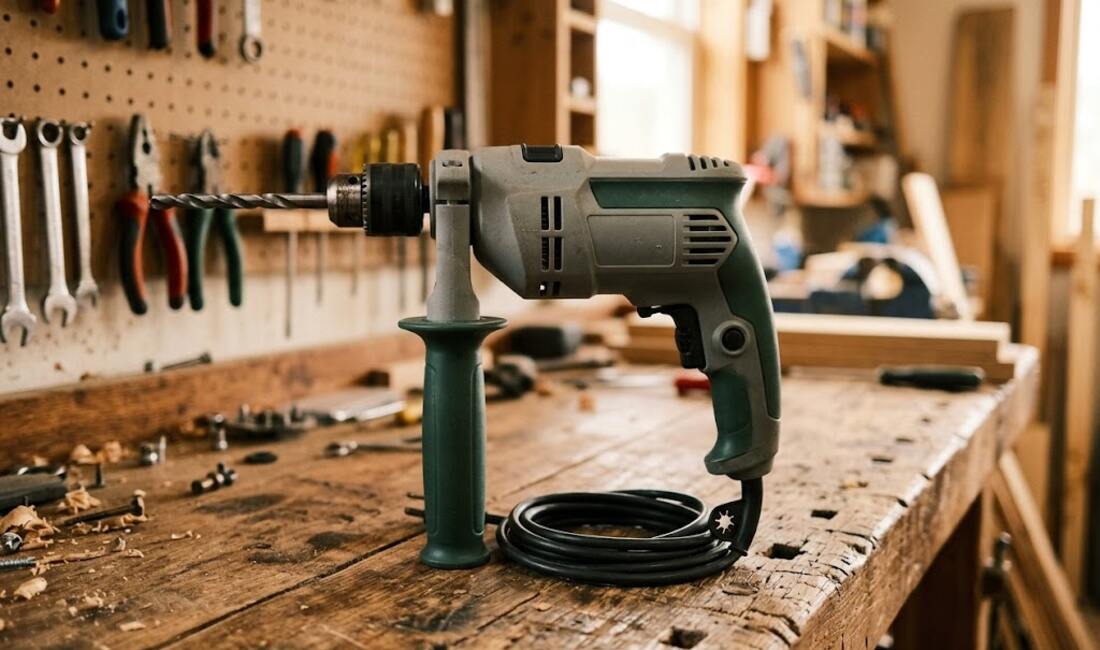
A corded drill/driver bores holes and drives or removes screws. Variable speed trigger: start slow for control, speed up once moving. Reverse switch backs screws out. The chuck opens and closes to hold different bit sizes — a 1/2-inch chuck accepts any standard bit. Corded means wall power. No battery to die, no platform to get locked into. A good corded drill bought in 1985 still works today. Look for 7 amps or higher.
- Drilling holes in wood — shelves, fences, decking, framing, furniture
- Driving screws — deck screws, drywall screws, cabinet screws
- Removing stripped screws — reverse plus slow speed gives you the torque a screwdriver gave up on
- Drilling into masonry with a carbide bit — concrete anchors, brick wall mounts
- Mixing paint or joint compound — a paddle mixer bit turns it into a power mixer
- Pumping water with a bilge pump attachment — drill-powered water pumps move water fast; useful after flooding
- Driving a hole saw — cuts perfect circles for doorknob holes, pipe pass-throughs, vent openings
- Wire brushing rust — a wire brush wheel strips rust off metal faster than any hand work
- Driving lag screws with a hex adapter — lag screws for deck ledgers drive in with a 1/2-inch hex socket in the chuck
- The cord is the limitation — needs an outlet or extension cord. Doesn’t work in a power outage without a generator.
- No impact function — for driving long screws into hard wood, an impact driver is better
- Torque can twist your wrist — when a large bit grabs suddenly, use two hands and brace yourself
- Not a hammer drill for serious masonry — for heavy concrete work, use a dedicated rotary hammer
1/2-inch chuck, 7-amp or higher, variable speed, reversible. Brand is secondary. Dewalt, Makita, Porter-Cable, and Skil all make solid corded drills that last decades. Test used units: plug in, trigger forward and reverse, listen for grinding. If it runs smooth both ways, buy it.
A corded impact driver is a specialized power tool that combines rotation with rapid hammering pulses — up to 3,000 impacts per minute. When a screw meets resistance, the impact mechanism fires: a weighted hammer inside the tool strikes an anvil in short bursts, converting that hammer energy directly into rotational force at the bit tip. The result is massive driving torque with almost zero reaction force transmitted to your wrist. A regular drill fights back when a screw gets tight — the drill body tries to spin in your hand. An impact driver absorbs that reaction internally. One finger on the trigger drives a 3-inch deck screw through hardwood. That is the entire value proposition for older hands.
- Driving deck screws — 2” through 4” screws into lumber, hardwood, composite decking — no pre-drilling required in most cases
- Lag screws and structural fasteners — the impact mechanism drives 3/8” lag screws that would require a wrench and body weight with a drill
- Long drywall screws — drives into studs cleanly without the drill body twisting when the screw seats
- Sheet metal screws into metal studs — the impact punches through sheet metal where a drill would skip and strip
- Removing stuck screws — reverse plus impact mode breaks loose screws that a drill would spin out of
- Fence and gate hardware — carriage bolts, hinge lag screws, hasp hardware in treated lumber
- Loosening rusted bolts outdoors — with a hex socket adapter, the impact mechanism breaks loose corroded bolts that would shear off with steady torque
- Driving screws one-handed — because there’s no reaction torque, you can brace with one hand and drive with the other — impossible with a drill
- Driving screws at awkward angles — the short body fits into spaces a drill won’t, and the impact means you don’t need two-handed leverage
- Self-tapping screws into metal — the impact mechanism punches the screw tip through without the bit skipping across the surface
- Removing lug nuts in an emergency — a 1/2” hex adapter and the correct socket will break loose most car lug nuts for a roadside tire change. Always re-torque lug nuts to manufacturer spec with a torque wrench before driving — impact tools can under- or over-torque, and a loose wheel is a fatal hazard.
- Loud — the impact mechanism is significantly louder than a drill. Wear hearing protection for extended use. The neighbors will know you’re working.
- Not for precision driving — the impacts make fine control difficult. For delicate screws, switch to a regular drill or ratchet screwdriver. An impact driver can strip small screws instantly.
- Requires impact-rated bits — standard screwdriver bits will shatter under impact. Buy bits labeled “impact rated” or “impact ready” — they’re hardened differently to absorb the hammer blows.
- 1/4” hex chuck only — most impact drivers accept only 1/4” hex shank bits. They do not accept round-shank drill bits. For drilling holes, switch to the drill.
- The cord — same limitation as any corded tool. Needs an outlet. Doesn’t work in a power outage without a generator.
Look for: variable speed trigger, forward/reverse switch, at least 1,400 in-lbs of torque, 1/4” hex chuck. Anything in that spec range from Dewalt, Makita, Porter-Cable, or Bosch will drive anything a homeowner encounters. Buy a set of impact-rated bits at the same time — Phillips #2 is the workhorse, but get a full set including Torx T20 and T25 for deck screws. A used corded impact driver is worth buying if it runs cleanly in both directions with no grinding. Test it: hold a screw against a piece of scrap wood and trigger it — if it drives clean and seats without stripping, buy it.
A corded impact wrench uses the same rotating-hammer mechanism as an impact driver but scaled up dramatically for heavy fasteners. Where an impact driver handles screws and small bolts, an impact wrench handles lug nuts, large hex bolts, and structural fasteners that would require a breaker bar and your full body weight to move by hand. The tool delivers hundreds of foot-pounds of torque in rapid hammer pulses. You hold it with one hand, pull the trigger, and bolts that have been rusted on for twenty years come loose. The 1/2-inch square drive accepts standard impact sockets in every size you’ll need.
- Removing and installing lug nuts — tire changes without a floor jack or breaker bar; one trigger pull per nut
- Large structural bolts — deck ledger lag bolts, carriage bolts, heavy bracket hardware
- Seized outdoor fasteners — rusted bolts on gates, equipment, trailers, and lawn machinery
- Generator and equipment maintenance — large drain plugs, housing bolts, mounting hardware
- Breaking loose frozen plumbing unions — with the right socket adapter, large threaded unions that won’t budge by hand give way immediately
- Driving large lag screws into concrete anchors — with a hex adapter, drives anchors that would take 30 minutes by hand in seconds
- Loosening overtightened machine bolts — on equipment that was assembled with an air tool and has never come apart since
- Requires impact-rated sockets — chrome sockets will shatter under impact wrench torque. Use only black oxide impact sockets.
- Easy to overtighten — the tool applies far more torque than most fasteners need. Use a torque wrench for final tightening on critical fasteners like lug nuts.
- Loud — louder than an impact driver. Hearing protection for any extended use.
- Heavy — corded impact wrenches are heavier than drivers. One-handed use over your head gets tiring fast.
1/2-inch square drive, 300 ft-lbs minimum torque, variable speed trigger, forward/reverse. Ingersoll Rand, Dewalt, and Chicago Pneumatic make reliable corded units. Buy a set of impact sockets (1/4” through 1” SAE and 8mm through 24mm metric) at the same time — the wrench is useless without them. A used corded impact wrench in good condition is worth buying — test it in both directions and listen for consistent impact sound.
An angle grinder spins an abrasive or cutting disc at 10,000+ RPM at a 90-degree angle to the motor shaft. That spinning disc cuts, grinds, polishes, or removes material depending on what disc is mounted. A thin cutting disc slices through steel, aluminum, copper pipe, rebar, and bolts. A grinding disc removes welds, smooths rough cuts, and shapes metal. A wire cup removes rust and paint. A diamond blade cuts tile, concrete, and brick. The 4.5-inch size is the most useful for a homeowner — powerful enough for real work, small enough to control with two hands.
- Cutting metal rod, pipe, and bolt stock — faster and cleaner than a hacksaw for anything over 1/4-inch diameter
- Removing rust from metal surfaces — a wire cup or flap disc strips rust down to bare metal in seconds
- Cutting ceramic and porcelain tile — a diamond blade makes curved cuts that a tile saw can’t
- Grinding down weld beads and sharp edges — smooths rough cuts and removes burrs from cut metal
- Cutting through seized or rusted bolts — when no wrench will move it, a cutting disc removes it in seconds
- Sharpening lawn mower blades — a grinding disc puts a working edge back on a dull blade in two minutes
- Cutting concrete anchors flush — when a bolt is set in concrete and sticks up too far, a cutting disc removes it flush with the surface
- Removing old mortar from brick — a mortar raking disc cleans out joints for repointing without damaging the brick faces
- Polishing metal with a flap disc — progressively finer flap discs bring bare metal to a near-mirror finish
- The most dangerous tool in the shop — a disc that shatters at 10,000 RPM becomes shrapnel. Use only discs rated for angle grinders. Never use a circular saw blade. Eye protection and gloves are not optional — they are mandatory every single time.
- Kickback is real — if the disc binds in a cut, the grinder kicks back hard and fast. Keep your body out of the disc’s line of travel. Two-handed grip always.
- Sparks travel far — a 4.5-inch grinder throws sparks 10+ feet. Clear flammables from the entire area before starting.
- Discs wear and need replacement — a worn cutting disc is a dangerous disc. Replace before it gets too thin.
4.5-inch disc size, 6 amp or higher, paddle switch (not a sliding switch), with a tool-free guard adjustment. Dewalt, Makita, and Bosch make reliable corded grinders. Buy a variety pack of discs: thin cutting discs (for metal), grinding discs, flap discs (for finishing), and a wire cup (for rust removal). Never use a disc that is chipped, cracked, or older than its expiration date.
A random orbital sander spins a round sanding pad in small random circles while also rotating it. That combination of motions means no single scratch line ever repeats — which is why it leaves no swirl marks in wood the way a straight-line or circular sander does. You move it slowly across the surface and let the tool do the work. The dust collection port connects to a shop vac or the built-in bag to keep the work area clear. Light enough to use with one hand for most jobs, which matters when your other hand is holding the workpiece steady.
- Smoothing wood before painting or staining — start with 80 grit, move to 120, finish with 220 for a paint-ready surface
- Removing old paint from wood — 60 grit removes paint fast without gouging; step up through the grits to finish
- Smoothing wood filler and spackle — 120 grit levels filled areas flush with the surrounding surface
- Scuff-sanding between paint coats — 220 grit lightly abraded between coats helps paint bond and eliminates brush marks
- Refinishing furniture — removes old finish and prepares bare wood for stain or paint
- Removing rust from flat metal surfaces — with 60 or 80 grit, strips surface rust from sheet metal, tool surfaces, and flat brackets
- Smoothing concrete patch and floor leveler — once cured, a 60-grit disc knocks down ridges and trowel marks
- Sanding fiberglass and body filler — works on automotive and marine filler the same way it works on wood filler
- Slow material removal — for removing a lot of wood or paint fast, a belt sander or angle grinder is faster. The orbital is for finishing, not heavy stock removal.
- Dust gets everywhere — even with dust collection, fine sanding dust escapes. Wear a dust mask rated N95 or better. Sand outdoors when possible.
- Pressing too hard slows it down — let the tool’s weight do the work. Pressing hard loads the pad and slows the random motion that prevents swirl marks.
5-inch pad, variable speed, hook-and-loop disc attachment, dust port. Dewalt, Makita, and Porter-Cable all make solid corded orbital sanders. Buy a sanding disc assortment pack: 60, 80, 120, and 220 grit, at least 10 discs of each. The hook-and-loop attachment means disc changes take three seconds. Avoid the cheapest sanders — a worn pad bearing causes vibration that defeats the random orbital motion and leaves swirl marks.
A heat gun is an electric tool that blows a concentrated stream of very hot air — typically between 120°F and 1,100°F depending on the setting. That hot air softens, shrinks, loosens, dries, or melts whatever it’s aimed at. The variable temperature is the critical feature: low heat (around 250°F) shrinks electrical tubing and loosens adhesive stickers without scorching; medium heat (around 500°F) softens paint for scraping and bends PVC pipe; high heat (700°F and above) loosens rusted bolts, strips multiple layers of paint, and welds certain plastics. A heat gun looks like a hair dryer but runs four to ten times hotter. It is not a hair dryer. It will melt plastic, ignite wood, and burn skin on contact. It is also one of the most genuinely useful tools in the shop for the specific jobs nothing else handles well.
- Stripping paint from wood and metal — heat softens the paint until it bubbles, then a putty knife removes it cleanly in long strips — faster than sanding, no chemicals
- Shrinking heat shrink tubing on electrical splices — the low setting shrinks the tubing evenly in seconds for a waterproof, professional connection
- Removing stickers, labels, and adhesive residue — 30 seconds of heat softens the adhesive so the sticker peels off cleanly with no tearing or residue
- Bending PVC pipe — heat a section evenly until it softens, bend to the angle you need, hold until it cools and sets — no fittings required
- Loosening stuck bolts and fittings — heat expands the metal around the bolt, breaking the rust bond so it turns with normal tool pressure
- Softening old putty and caulk for removal — heat the putty until it softens, then the putty knife removes it cleanly without gouging the surface
- Removing vinyl flooring and floor tiles — heat the tile from above until the adhesive softens, then slide a floor scraper underneath and it lifts cleanly
- Thawing frozen pipes — low heat setting only, held at least 6 inches from the pipe, moving constantly — never stationary. Open a faucet before you start so steam pressure has an exit. Stop immediately if you smell burning or see discoloration. Do not use on pipes inside walls where you cannot see the full pipe length.
- Drying wet wood before painting or gluing — a slow pass removes surface moisture so paint adheres and glue bonds properly
- Removing dents from plastic bumpers and panels — heat the plastic until it softens slightly, push from behind, the plastic reforms to its original shape
- Welding plastic bags and sheeting — low heat fuses polyethylene edges together — useful for patching tarps or creating waterproof seams
- Starting charcoal without lighter fluid — aim a heat gun at the bottom of a charcoal chimney for 60 seconds and it lights without chemicals or paper
- Loosening stripped screw heads — heat the screw until it expands, let it cool slightly, then try the screwdriver again — the thermal cycle often breaks the corrosion bond
- It will burn things — wood ignites around 480°F. Most heat guns exceed this on high. Keep it moving. Never hold it stationary on any combustible surface.
- It will melt things you didn’t intend to melt — plastic window frames, vinyl siding, wiring insulation, painted surfaces nearby. Shield adjacent materials with aluminum foil or a heat deflector.
- The nozzle stays hot after you turn it off — the element cools slowly. Set it down pointing away from everything, or hang it by the cord. Never set it flat on a surface immediately after use.
- Lead paint warning — heating paint in homes built before 1978 can vaporize lead. Use a respirator rated for lead, or test the paint first with a lead test kit before using heat to strip it.
- Not for soldering — a heat gun cannot deliver the localized heat needed for solder joints. Use a soldering iron for electronics.
Variable temperature with at least two settings — low (around 250°F) and high (around 750°F) — is the minimum. A fully variable dial is better. Look for 1,500 watts or higher — underpowered heat guns take forever to reach working temperature. Every major tool maker offers a reliable homeowner heat gun, and the standard homeowner models share the same virtues — inexpensive, reliable, parts available. Nozzle attachments are useful: the deflector nozzle spreads heat for paint stripping, the concentrator nozzle focuses heat for shrink tubing and bolt work. Buy a heat gun that comes with both or has them available separately. Find them used at garage sales and estate sales — heat guns have no moving parts and last indefinitely if not physically damaged.
An extension cord moves an outlet to wherever you need it. The gauge (wire thickness) determines how much current it can carry without voltage drop — which matters because voltage drop reduces tool power and generates heat in the cord. A 12-gauge cord carries 20 amps safely at 50 feet — enough for any corded tool you own. A 16-gauge cord — the cheap one — starts dropping voltage under load at 25 feet, which makes your drill run slow, your saw bog down, and your cord get warm. Buy the right gauge once and never think about it again.
- Powering every corded tool on this list — drill, impact driver, angle grinder, sander, heat gun, all of them
- Reaching from garage to driveway, yard, or roof — 50 feet gets you to the far end of most residential lots
- Generator power distribution during outages — runs from a generator outside to appliances inside through a window or door gap
- Temporary power to outbuildings and work areas — shed, detached garage, work area without its own outlet
- Running power to a generator outside during an outage — a 50-foot 12-gauge cord reaches from an outdoor generator to appliances inside through a window or door gap; 12-gauge handles the load without voltage drop
- Temporary power to a shed, carport, or work area — before you run permanent wiring, a 12-gauge extension cord provides reliable temporary power for tools and lights
- Emergency refrigerator power during repair work — move a refrigerator away from the wall for repairs without unplugging — the 50-foot length gives you full slack to work
- Powering outdoor holiday lighting — 12-gauge handles multiple light strings without the voltage drop that dims lights and stresses cheaper cords
- Never use a cord that is coiled under load — a coiled cord acts as an inductor and generates heat. Unroll the full length before plugging in any tool.
- Damaged insulation is a fire and shock hazard — inspect the cord before every use. Any crack, cut, or exposed wire means the cord is done. Replace it.
- Do not run through doors or windows pinched in the frame — insulation damage from pinching is invisible until it fails.
- Outdoor use requires an outdoor-rated cord — look for a W in the cord designation (e.g. SJTW). Indoor cords used outdoors deteriorate in UV and moisture.
50 feet, 12-gauge (12 AWG), three-prong grounded, outdoor rated (W designation), orange or yellow. Southwire and Husky make reliable cords at reasonable prices. The bright color is not optional — you need to see it on the ground before you trip over it or run over it with a lawnmower. Buy two: one for the garage and one for the generator. A cord you have to hunt for is a cord that slows every job down.
A soldering iron heats a metal tip to a precise temperature — typically 600–750°F for electronics work — which melts solder (a tin-lead or tin-silver alloy) to permanently join two metal surfaces. When done correctly, a solder joint is electrically and mechanically stronger than the wire itself. Temperature control is the critical feature: too cold and the solder won’t flow properly, leaving a cold joint that looks connected but fails under vibration. Too hot and you damage components, burn insulation, or lift pads on circuit boards. A dial or digital temperature station gives you repeatable, consistent heat for every joint.
- Repairing lamp cords and appliance wiring — splice broken wires with a permanent solder joint instead of wire nuts that vibrate loose
- Replacing switches, sockets, and plugs — solder connections on lamp sockets, power plugs, and appliance connectors
- Automotive wiring repairs — trailer wiring, accessory wiring, battery terminal repair
- Electronics repair — replacing capacitors, resoldering loose connections on circuit boards, fixing broken headphone cables
- Cutting and sealing synthetic rope and webbing — the hot tip melts through nylon and polyester cleanly and seals the end to prevent fraying simultaneously
- Burning decorative patterns into wood — pyrography (wood burning) with a soldering iron produces fine, controlled line work
- Repairing plastic eyeglass frames — very low heat on a thick tip can fuse broken plastic frame pieces together at the break
- The tip oxidizes and stops tinning — a black, non-shiny tip won’t transfer heat properly. Clean it on a brass wire tip cleaner frequently during use and re-tin it with fresh solder before storing.
- Solder fumes are harmful — work in a ventilated area. The flux in rosin-core solder produces fumes that irritate respiratory passages over time.
- Cold joints look like good joints — a dull, grainy solder joint is a cold joint. It will fail. Good joints are shiny and smooth. If it looks dull, reheat it.
Weller WE1010 or Hakko FX-888D — those are the two benchmarks for homeowner and hobbyist use. Both are temperature-controlled stations, not pencil irons. Buy rosin-core solder (60/40 tin-lead for general use), a brass wire tip cleaner (not a wet sponge — the thermal shock from a wet sponge shortens tip life), and a third-hand clamp or helping hands tool to hold work steady. A Weller or Hakko station bought today will outlast you if you keep the tips clean.
Striking Tools — Hammers and Mallets
A claw hammer does two things: the face drives nails, and the claw pulls them out. That sounds simple because it is — and for home repair, it covers an enormous range of work. The 16-ounce head is the standard for general use: heavy enough to drive a 16d framing nail in three or four strokes, light enough to use all day without arm fatigue. The Estwing is one piece of forged steel from head to handle — no wood joint to loosen, no fiberglass insert to crack, no handle to replace. The leather grip wrapped over the steel handle absorbs vibration better than bare metal and better than most wood handles. Estwing has been making this exact hammer in Belleville, Illinois since 1923. The design has not changed because it does not need to. A used Estwing from a garage sale is not a compromise — it is often better than a new import.
- Driving nails — finish nails for trim, common nails for framing, roofing nails, duplex nails for concrete forms — any nail that needs to go into any material
- Pulling nails — the curved claw levers nails out cleanly; rock the handle back while the claw bites and the nail comes straight out
- Tapping things into alignment — door hinge pins, drawer slides, furniture joints, anything that needs persuading without a full blow
- Breaking things apart — demolition work, removing old trim, knocking apart furniture, breaking drywall for access
- Adding torque to wrenches and screwdrivers — tap the handle end of any wrench or screwdriver to break loose a stuck fastener that hand strength alone won’t move
- Striking chisels and punches — mortising hinges, driving center punches, setting drift pins
- The claw as a pry bar — the curved claw levers under boards, trim, and tiles with controlled force — more precise than a pry bar for small demolition
- Scoring drywall — drag the claw across drywall to score a cut line before snapping the panel — faster than a utility knife for rough cuts
- Stretching carpet — the claw hooks into carpet backing and the handle gives you pulling leverage to stretch a section flat before tacking
- Setting staples flush — tap the flat face over a staple that didn’t seat fully and drive it flush with one light strike
- Magnetic nail holder — many Estwing hammer faces have slight magnetism that will hold a nail upright for starting in tight spots where your fingers won’t fit
- Emergency vehicle exit — if you are trapped in a vehicle and cannot open the door, the poll (back of the head) will break a side window — aim at the lower corner, cover your face, and turn away. This is a genuine emergency technique, not general use.
- One-piece steel transmits vibration — the steel handle transmits more shock than a wood handle on a missed strike or hard surface hit. The leather grip reduces this but doesn’t eliminate it. For people with tennis elbow or severe wrist issues, a fiberglass-handled hammer absorbs more shock.
- 16oz is not for heavy framing — for driving 16d nails into structural lumber all day, a 20oz or 22oz framing hammer is faster and less tiring. The 16oz is the all-purpose size, not the heavy-work size.
- The claw is curved, not straight — curved claws are for pulling nails. Ripping apart lumber and prying boards apart is easier with a straight-claw framing hammer or a dedicated pry bar.
- The leather grip ages — old Estwings may have dried or cracked leather. A replacement grip is available and easy to install, or wrap the handle with electrical tape or leather lace to restore the grip.
The Estwing E3-16C — 16oz curved claw, leather grip — is the one. It has been the standard for finish carpenters and general contractors for 100 years. Buy it new or find it used — condition is nearly irrelevant because there are no joints to fail and the steel doesn’t wear out. At a garage sale: pick it up and swing it. The head should feel balanced over your hand, not nose-heavy. Check the face — minor pitting from use is normal; deep gouges or chipping at the edges is not. Check the claw tips — they should be sharp, not rounded. If all of that is true, buy it at any fair price. An Estwing from 1955 is a better hammer than most new imports sold at big box stores today.
A ball peen hammer has a flat face on one end and a rounded ball on the other. The flat face strikes punches, chisels, and metal surfaces. The ball end — the peen — sets rivets by spreading the rivet shank, shapes and work-hardens metal, and fits into spaces the flat face can’t reach. It is the machinists’ and metalworkers’ hammer — designed for metal work where a claw hammer’s face geometry is wrong and its claw is useless. The Estwing is one piece of forged steel, made in Belleville, Illinois, with a leather grip that absorbs shock. The 12oz handles light punch work and detail tasks. The 24oz drives heavy punches and does real metalwork.
- Striking center punches and pin punches — marking drill locations, driving out roll pins and cotter pins from machinery
- Striking cold chisels — cutting metal, breaking welds, splitting rusted nuts that won’t turn
- Setting rivets — the ball end spreads the rivet shank evenly without the flat face marking the work
- Tapping metal parts into alignment — where a claw hammer face would leave marks, the smooth face of a ball peen does not
- Breaking apart rusted assemblies — shock-loading rusted joints that penetrating oil alone won’t free
- Texturing metal surfaces — the ball end peened over sheet metal creates a decorative dimpled texture used in metalworking and jewelry
- Work-hardening soft metal — repeated ball peen blows on copper or aluminum work-hardens the surface, increasing its resistance to deformation
- Driving stakes and tent pegs — the flat face drives steel stakes cleanly without the claw getting in the way
- Not for nails — the flat face is hardened for metal work, not wood. Driving nails with a ball peen is technically possible but the face geometry makes it awkward. Use the claw hammer for nails.
- The ball end leaves marks — anywhere you strike with the ball, it leaves a round impression. Intentional for rivets and texturing; not intentional elsewhere.
Buy the 12oz and 24oz at minimum. The 12oz handles punch work, pin driving, and light metal tasks. The 24oz handles heavy punches, cold chisels, and anything requiring real force. The Estwing E3-12BP (12oz) and E3-24BP (24oz) are the standards — one-piece forged steel, made in the USA, lifetime guarantee. Find them at garage sales — any Estwing ball peen in any condition that passes a basic inspection is worth buying.
A rubber mallet delivers impact force without leaving a mark. The rubber head absorbs and distributes the blow across a larger surface area than a steel hammer face, which spreads the force without concentrating it enough to dent or mar the surface being struck. It hits hard enough to drive door jambs into position, seat tile, knock furniture joints together, and persuade stuck parts to move — but the rubber head bounces slightly rather than biting in, so finished surfaces, wood, tile, and plastic come through unmarked. It is the tool you reach for when you need a hammer but can’t leave a mark.
- Furniture assembly — driving dowels, knocking joints together, seating table legs without splitting the wood or bruising the finish
- Setting tile — tapping tile flat into mortar or adhesive after placement without cracking it
- Installing door and window casings — tapping trim into position against the wall without denting the wood
- Automotive body work — persuading body panels, bumper covers, and trim pieces into position without damage
- Driving chisels into wood — when a steel hammer would split a wooden chisel handle, a mallet drives the chisel safely
- Removing stuck drawer slides and cabinet hardware — a rubber mallet taps them free without the steel hammer marks that would require filling and painting
- Seating copper pipe fittings — after soldering, tap fittings fully home without distorting the soft copper
- Breaking up soil and clay in garden beds — the flat face breaks up compacted soil clods without damaging a spade or fork handle
- Not for nails or metal fasteners — the rubber head won’t drive a nail. It will deflect off a nail head and go sideways. Use the steel hammer for anything that needs to be driven into a surface.
- Rubber degrades over time — old rubber mallets harden, crack, and chip. A chipped rubber head leaves rubber fragments on your work surface. Replace when the head shows cracking.
- Less force than a steel hammer — for stuck things that genuinely need serious force, the rubber mallet may not be enough. Use a block of wood and a steel hammer to protect the surface while delivering more force.
16oz rubber mallet with a wood or fiberglass handle. Dead-blow mallets — which have a hollow head filled with sand or shot — are even better because they don’t bounce back after striking. If you can find a dead-blow mallet at the same price as a rubber mallet, buy the dead-blow. Estwing, Vaughan, and Tekton all make reliable mallets. This is one tool where brand doesn’t matter much — any quality mallet with a solid rubber head and a sturdy handle will last decades.
Cutting and Shaping Tools
A hacksaw cuts metal, plastic, and any other material harder than wood using a replaceable blade stretched tight in a C-frame. The blade has fine teeth — 18 to 32 teeth per inch — that take small bites with each stroke. TPI (teeth per inch) determines what it cuts well: 24-TPI for steel, copper, and aluminum; 18-TPI for plastic pipe, conduit, and softer materials. The blade is cheap and replaceable — when it dulls, you replace it, not the tool. A good hacksaw frame lasts a lifetime. The blades are consumables.
- Cutting bolts to length — when a bolt is too long, a hacksaw cuts it cleanly; a file removes the burr
- Cutting plastic pipe and conduit — PVC, CPVC, EMT conduit, and ABS pipe all cut cleanly with 18-TPI
- Cutting copper pipe — when a pipe cutter won’t fit, a hacksaw reaches anywhere
- Cutting metal rod, bar stock, and threaded rod — 24-TPI handles all standard hardware store metal stock
- Removing rusted bolts and screws — cut a slot in a rusted bolt head and drive it with a flat screwdriver; or cut the bolt off entirely
- Cutting ceramic tile in tight spaces — a 24-TPI blade cuts tile slowly but accurately in places a tile saw won’t reach
- Cutting fiberglass and carbon fiber — fine-tooth hacksaw blades handle composite materials that destroy wood saws
- Making a slot in a stripped screw head — cut a new flat-head slot across a damaged Phillips head so a flat screwdriver can back it out
- Blades dull quickly on hard steel — hardened bolts, stainless steel, and tool steel eat blades fast. Buy bi-metal blades, not carbon steel — they last significantly longer on hard materials.
- The blade must be tight — a loose blade wanders, breaks, and cuts poorly. Check blade tension before every use.
- Slow compared to power tools — for high-volume cutting, an angle grinder or reciprocating saw is faster. The hacksaw earns its place for precision cuts and tight spaces.
Any quality hacksaw frame with blade tension adjustment — Stanley, Irwin, and Lenox all make good ones. The frame is forever; buy it once. Buy bi-metal blades in both 18-TPI and 24-TPI — at least 5 of each. Bi-metal blades have a high-speed steel cutting edge welded to a flexible alloy steel back — they outlast carbon steel blades 5 to 1 on hard materials. Keep a pack of spare blades in the toolbox at all times.
A crosscut hand saw cuts wood perpendicular to the grain — across the board — using a row of sharpened teeth that each remove a small chip of wood with every stroke. A good modern hand saw with hardened teeth cuts faster than most people expect and leaves a cleaner edge than a circular saw without a fine-tooth blade. The 15-inch blade length handles any board width you’ll encounter in a house. No electricity, no extension cord, no setup time — for a single cut, the hand saw is often faster than finding and setting up a power saw.
- Trimming door jambs for new flooring — undercut jambs so flooring slides underneath cleanly
- Cutting lumber to rough length — 2x4s, 2x6s, and dimensional lumber for framing and repairs
- Cutting plywood and sheet goods — crosscut across the panel width for manageable pieces
- Pruning large branches — a crosscut saw handles branches too large for loppers
- Any single cut where a power saw is overkill — trim one board, cut one piece of molding, shorten one shelf
- Cutting drywall — score with a utility knife and snap, or cut curves and odd shapes with the hand saw directly
- Cutting fiberglass insulation batts — a sharp hand saw cuts through batt insulation cleanly without compressing it the way a utility knife does
- Starting a cut in an awkward spot — the hand saw reaches into corners, against walls, and at angles that power saws can’t manage
- Tires your arm faster than a power saw — for more than a few cuts, fatigue sets in. The hand saw is for occasional cuts, not production work.
- Modern hardened-tooth saws cannot be sharpened — the teeth are impulse-hardened and too hard to file. When the saw dulls, replace it. They’re inexpensive enough that this is fine.
- Wandering on long cuts — use a straight edge or a speed square to guide the first few strokes and establish the kerf before cutting freehand.
Any modern hand saw with hardened teeth — Stanley FatMax, Irwin, or Suizan. The modern induction-hardened tooth saws cut three times faster than old-style saws and the blades are cheap to replace. A 15-inch blade handles everything in a home. Look for 8-10 TPI for general crosscutting. Japanese pull saws cut on the pull stroke and leave an exceptionally clean edge — worth buying as a second saw for finish work.
A utility knife holds a replaceable trapezoidal blade in a metal body with a retractable mechanism. The blade extends when you need it, retracts when you don’t. The replaceable blade is the key insight: when the blade dulls — which happens faster than most people realize — you snap off the tip or swap the blade entirely and you have a sharp knife again in ten seconds. A dull blade requires more force, wanders off the cut line, tears instead of cuts, and is far more likely to slip and cut you. The metal body lasts indefinitely. The blades are cheap. Change them constantly.
- Scoring and snapping drywall — score deeply with the knife, snap over a straight edge, cut the paper backing
- Cutting carpet and flooring — vinyl plank, carpet, sheet vinyl, rubber flooring — all cut cleanly with a sharp blade
- Opening boxes and packaging — faster and safer than scissors for heavy cardboard and strapping tape
- Trimming caulk beads — cut old caulk lines clean before recaulking
- Stripping wire insulation — score the insulation lengthwise and peel it away when a wire stripper isn’t handy
- Scribing trim to an irregular wall — run the knife along the wall contour against the back of the trim to mark the exact cut line
- Cutting rope, webbing, and zip ties — cleaner than scissors on thick material, faster than wire cutters on webbing
- Cleaning paint from window glass — held flat against the glass, the blade scrapes dried paint without scratching
- Starting nails in tight spots — score a small pilot mark in wood with the blade tip so a nail starts straight without splitting
- Most cuts that go wrong are from dull blades — a dull blade requires force and slips. Change the blade the moment it starts to drag. Blades are cheap. Emergency room visits are not.
- Always cut away from your body — the blade goes where force takes it. If it slips, it should go away from you, not toward you.
- Retract before setting down — a utility knife set down with the blade extended is a guaranteed cut for whoever picks it up next.
Stanley FatMax or Irwin ProTouch — metal body, comfortable grip, smooth blade retraction. Never buy a plastic-body utility knife — the body flexes under load and the blade release mechanism fails. Buy a 50-pack of blades at the same time. Keep the knife in your tool belt or apron pocket — the utility knife is the tool you reach for 20 times a day on any project, and if it’s in the toolbox across the garage you’ll stop reaching for it.
A wood chisel is a steel blade with a flat cutting edge, driven by hand pressure or a mallet, that removes precise amounts of wood from a surface. The bevel on the cutting edge determines the cut angle — bevel down for roughing out material, bevel up for paring fine cuts. The three sizes cover the most common jobs: 1/4-inch for tight slots and detail work, 1/2-inch for most hinge mortises and general paring, 1-inch for cleaning out wide notches and broad surfaces. A sharp chisel takes a thin shaving of wood cleanly. A dull chisel tears and requires force, which makes it dangerous and inaccurate.
- Mortising door hinges — the most common homeowner chisel job. Mark the hinge outline, score the perimeter, remove the wood to the right depth so the hinge sits flush
- Cleaning up notches cut by a saw — a saw leaves a rough bottom; the chisel pares it flat and smooth
- Fitting door strike plates — the strike plate mortise and the bolt pocket behind it both require chisel work
- Removing old putty and caulk from wood joints — the chisel tip gets under old material and pops it out without damaging the surrounding wood
- Splitting wood along the grain — place the chisel in the grain and tap; the wood splits cleanly along its natural lines
- Removing dried glue from wood joints — the flat back of the chisel scrapes dried PVA glue cleanly off wood surfaces
- Opening paint-sealed windows — run the chisel edge along the paint seal between the sash and the stop to break the bond without damaging the wood
- A dull chisel is dangerous — dull tools require force, force causes slipping, slipping causes cuts. Keep chisels sharp. A honing guide and a sharpening stone cost less than one emergency room visit.
- Never use a chisel as a pry bar — the blade is hardened for cutting, not for bending loads. Prying with a chisel snaps the blade.
- Plastic handles crack under mallet blows — buy wooden-handled chisels. The wood compresses slightly under impact and doesn’t shatter the way plastic does.
Stanley 16-Series, Buck Brothers, or Narex — three-piece set in 1/4”, 1/2”, and 1”. Find old American-made chisels at garage sales — Stanley chisels from the 1950s–1980s are excellent tools that sharpen beautifully and outlast new imports. Check the tip for chips or cracks. A chisel with a slightly dull edge is fine — you’ll sharpen it anyway. A chisel with a chipped or broken tip needs grinding before it’s useful, which is more work than it’s worth unless it’s free.
A file is a hardened steel tool with rows of cutting teeth that remove small amounts of metal, plastic, or wood with each stroke. The four profiles serve different jobs: the flat file smooths flat surfaces and removes burrs from cut edges; the round file (rat-tail) enlarges holes and smooths curved inside surfaces; the half-round does both — flat work on one side, curved work on the other; the triangular file sharpens saw teeth and gets into V-shaped grooves. Files are cut in single-cut (one row of teeth) for fine work and double-cut (two crossing rows) for fast material removal. The key accessory is a file card — a wire brush that clears metal chips from the teeth before they build up and scratch the work.
- Removing burrs from cut metal — after a hacksaw or angle grinder cut, the flat file removes sharp edges in seconds
- Sharpening lawn mower blades — a flat bastard file puts a working edge back on a dull mower blade without removing it from the mower
- Fitting metal parts — when a bracket, hinge, or plate is slightly too large, the file removes material precisely until it fits
- Enlarging holes slightly — when a drilled hole is 1/32 too small for a bolt, the round file opens it without drilling again
- Smoothing rough pipe ends — after cutting copper or PVC, the file removes the lip and prepares the end for a fitting
- Improving the fit of a key that sticks — a flat file removes the high spot on a key that catches in the lock
- Cleaning corroded battery terminals — the flat file removes corrosion from battery terminals and cable ends faster than sandpaper
- Deburring plastic pipe cuts — the half-round cleans inside the pipe end so it accepts a fitting without restriction
- Files only cut on the push stroke — lift the file off the work on the return stroke. Dragging it back loads the teeth with chips and dulls them.
- Clogged teeth scratch instead of cut — use the file card every few strokes. A clogged file is nearly useless and damages the work surface.
- Files are brittle — they are hardened throughout and will snap if dropped or used as a pry bar. They are cutting tools, not levers.
A 4-piece set — flat, round, half-round, triangular — in bastard cut (medium coarseness). Nicholson and Simonds are the American benchmarks for quality files. Find them at garage sales — old American-made files are significantly better than new imports and last indefinitely if kept clean and stored so the teeth don’t contact other metal. Buy a file card at the same time. Without a file card, a file is half as useful.
Tin snips cut sheet metal, aluminum, flashing, hardware cloth, and duct work using two hardened steel blades that shear through material like scissors through paper. Aviation snips — the compound-action version — use a compound lever mechanism that multiplies your hand force, making cuts through heavy sheet metal manageable with one hand. The handle color tells you the cut direction: red = straight and left curves, green = straight and right curves, yellow = straight cuts only. The two you actually need are red and green — between them you can cut any shape in any sheet metal.
- Cutting aluminum flashing — around windows, chimneys, and roof penetrations; flashing comes in rolls and needs cutting to length and shape
- Cutting hardware cloth and wire mesh — for garden beds, pest exclusion, and utility applications
- Cutting HVAC duct work — sheet metal duct sections, registers, and fitting connections
- Cutting steel strapping and banding — the metal straps on freight shipments and lumber bundles
- Cutting thin sheet metal for patches and repairs — roof patches, flashing repairs, appliance housing patches
- Cutting Kevlar and aramid fabric — aviation snips cut composite and synthetic materials that destroy ordinary scissors
- Trimming rubber gaskets and weatherstripping — the compound action handles dense rubber that scissors can’t cut cleanly
- Cutting roofing shingles — asphalt shingles cut faster and cleaner with aviation snips than with a utility knife in cold weather when shingles are stiff
- Cut edges are razor sharp — freshly cut sheet metal edges will cut you faster than a knife. Wear leather gloves every time. The edge isn’t just sharp — it’s burr-edged in a way that tears rather than cuts skin.
- The cut piece curls — the waste side of a tin snips cut curls away from the blade. This is normal but makes cutting to a line harder. Score a line with a scratch awl first and cut just outside it.
- Not for heavy gauge steel — aviation snips handle up to about 18 gauge steel. Thicker material needs a nibbler, angle grinder, or plasma cutter.
Red handle (left cut) and green handle (right cut) aviation snips — Midwest Snips, Wiss, or Malco. Midwest Snips are made in the USA and are the standard for professional sheet metal workers. Buy both colors — between red and green you can cut any curve in any direction. The yellow (straight cut) is optional if you have both colors. Find them at garage sales and estate sales — quality aviation snips last indefinitely and old American-made pairs are better than most new imports.
Measuring and Marking Tools
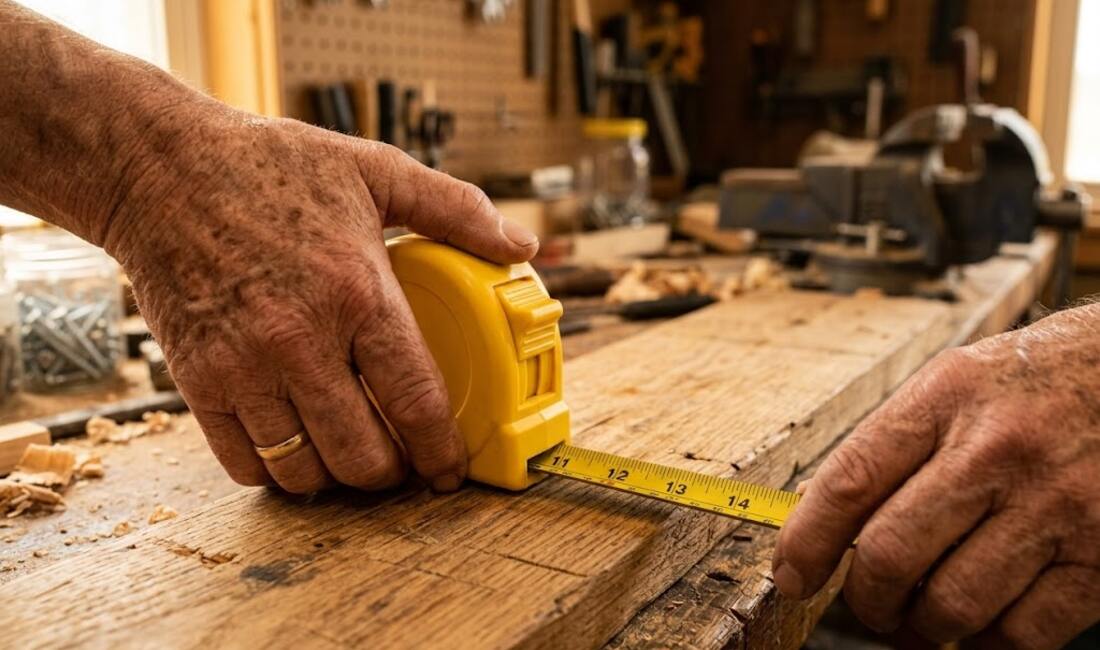
A tape measure is a coiled steel blade with inch and centimeter markings that locks in place at any length so you can read it with one hand. The hook at the end slides slightly — by exactly the thickness of the hook itself — so inside and outside measurements are both accurate without adjustment. The auto-lock button keeps the blade extended hands-free while you mark. The blade-standout spec tells you how far the blade extends horizontally before it buckles — 10 feet of standout means you can measure across a room alone without the blade collapsing before you reach the far wall.
- Measuring rooms for flooring, paint, and furniture — length, width, and diagonal to check square
- Cutting lumber and materials to length — measure twice, mark clearly, cut once
- Hanging pictures and shelves level — measure from the floor and from the side wall for consistent placement
- Rough framing — stud spacing (16” on center), header heights, door rough openings
- Buying appliances and furniture — measure the doorway, the space, and the item before you buy
- Checking if a room is square — measure both diagonals corner to corner; if they’re equal, the room is square
- Finding the center of anything — measure the total, divide by two, mark; the tape does the math visually
- Marking consistent spacing without a ruler — hook the end, extend to your spacing, mark along the blade edge repeatedly
- The hook as a scratch awl — the corner of the hook scribes a mark on wood or drywall when a pencil isn’t handy
- The blade kinks and creases — letting the blade snap back fast repeatedly damages the blade at the stress points. Press the lock before retracting.
- One-person measuring has limits — beyond 10–12 feet, you need a second person or a fixed hook point. A nail in the wall works as a third hand.
- Cheap tapes have inaccurate hooks — the sliding hook must move by exactly its own thickness. Budget tapes drift. For critical work, use a quality tape.
25 feet, auto-lock, 1-inch blade width minimum, 10-foot standout or better. The Stanley FatMax and Milwaukee 25-foot tape are the two benchmarks — both have 11-foot standout, tough blade coatings, and large easy-to-read markings. The FatMax is slightly heavier; the Milwaukee has a better belt clip. Either is the right answer. Buy a spare — tapes get left at job sites and loaned out and not returned. Keep one in the toolbox and one in the kitchen junk drawer.
A bubble level has one or more sealed vials of liquid with an air bubble inside. When the bubble centers between the two lines on the vial, the surface the level rests on is perfectly horizontal (level) or vertical (plumb), depending on which vial you’re reading. That’s the entire mechanism — no batteries, no calibration, no moving parts. The three sizes serve three different jobs: the 8-inch fits inside cabinets and on small items where a longer level won’t fit; the 16-inch handles shelves, picture rails, and door casings; the 36-inch reads countertops, long runs of trim, and cabinet installations where a short level would miss a gradual slope.
- Hanging shelves — the 16” reads the shelf directly; one person holds, the other checks and marks
- Installing door and window casings — the 8” fits the narrow reveal; the 36” checks the full door frame plumb
- Setting appliances level — refrigerators, washing machines, and dishwashers all require level installation to function correctly
- Hanging pictures in a row — rest the level on top of the frames to align a gallery wall without measuring each nail individually
- Checking floors before laying flooring — the 36” reveals high and low spots that need filling before tile or hardwood goes down
- Checking if a drain slopes correctly — a shower floor should slope 1/4” per foot toward the drain; the level confirms it
- Checking how level a parked camper or RV is — place on the floor inside to determine how many leveling blocks are needed under each wheel. Always apply wheel chocks and the parking brake before working around any vehicle on leveling blocks — never get under a vehicle supported only by leveling blocks.
- Finding the high point of a floor — slide the 36” across the floor; where the bubble moves off center is the high point that needs addressing
- Checking if a table or workbench rocks — a level tells you which leg is short before you start shimming
- They can be knocked out of calibration — dropping a level on a hard floor can shift the vial. Check calibration periodically: place on a flat surface, note the bubble position, flip the level end-for-end; if the bubble is in the same position relative to center, it’s accurate. If not, it’s off.
- Cheap vials are hard to read — the bubble should be crisp and clear. Bargain levels have cloudy vials or bubbles that move sluggishly. Buy a name-brand set.
- The 36” is awkward in tight spaces — that’s what the 8” is for. All three sizes earn their place.
Buy all three sizes at once — 8”, 16”, and 36”. Empire, Johnson, and Stanley all make reliable sets in this range. The magnetic versions are useful — the level sticks to metal surfaces and holds hands-free while you mark. Avoid the cheapest imported sets with cloudy vials. A set of three quality bubble levels costs less than a single service call for a crooked shelf installation or an unlevel appliance.
A speed square is a triangular aluminum square with a lip on one edge that hooks over the edge of a board. Hook the lip, slide it to your mark, and you have a guaranteed 90-degree line across the board — or rotate it to mark any angle from 0 to 90 degrees using the degree scale engraved along the hypotenuse. Place it against the shoe of a circular saw and it guides the saw in a perfectly straight line for crosscuts. Check the corner of a frame, a shelf, a door jamb, or any two surfaces for square in two seconds. It weighs almost nothing, fits in a shirt pocket, and every carpenter who has ever used one keeps one within reach at all times. Swanson invented this tool in 1925 and nobody has improved on the design since.
- Marking square cut lines on lumber — hook the lip, mark, cut — the fastest way to mark a 90-degree cut on any board
- Guiding a circular saw for crosscuts — hold the square against the saw shoe as a fence for a perfectly straight cut
- Checking corners for square — shelves, door frames, cabinet boxes, picture frames — any corner that should be 90 degrees
- Marking roof pitch angles — the degree scale marks any rafter angle; the common and hip/valley scales are on the hypotenuse
- Marking 45-degree cuts — miters for trim, picture frames, and molding
- As a depth gauge — the 7-inch leg measures depth of notches, mortises, and rabbets directly
- Scribing a line parallel to an edge — hook the lip on the edge, hold a pencil at the desired distance, slide along the board
- Checking plumb on small posts and door jambs — in a pinch, a level surface on the square plus a bubble level gives you plumb
- The 7-inch size limits you to boards up to 7 inches wide — for wider stock, a framing square or combination square is needed. For most homeowner work, 7 inches covers everything.
- Check it for square periodically — if a speed square is dropped or bent, it may no longer be accurate. Check it against a known square surface before trusting critical cuts.
Swanson S0101 — the original 7-inch speed square, made in Frankfort, Illinois since 1925. Accept no substitute. The Swanson is cast aluminum with engraved (not printed) markings that never wear off. Imitations have stamped or printed scales that fade and inaccurate casting that puts the degree marks in the wrong places. Find Swanson speed squares at garage sales constantly — carpenters accumulate them and they show up in every tool box. Any Swanson in any condition with no bent edges is worth buying at any price.
A stud finder locates the wood framing members (studs) hidden behind drywall. A magnetic stud finder uses a magnet to detect the drywall screws driven into studs during installation — no batteries, no calibration, works on any wall, lasts forever. Slow the magnet across the wall and it snaps toward the screw when it passes over one. An electronic stud finder detects the change in density between the hollow space between studs and the solid wood of the stud itself using capacitance sensors — it finds the edges and center of the stud but requires calibration against the wall and occasional false readings on walls with pipes, wires, or unusual construction.
- Finding studs before hanging heavy items — TVs, mirrors, shelving, artwork, cabinets — anything that needs a screw into solid wood rather than just drywall
- Locating studs for new electrical outlets and switches — outlets mount between studs; knowing where the studs are tells you where to cut
- Finding the center of a wall for hanging centered items — locate two studs, measure between them, find center
- Finding screws in painted-over wood trim — the magnetic finder locates screws buried under multiple coats of paint
- Locating floor joists through carpet — slide along the floor to find the joist screw pattern for securing squeaky floors
- The old-school method still works — knock on the wall with your knuckle. A hollow sound is between studs; a solid, slightly higher-pitched sound is over a stud. Use the finder to confirm.
- Electronic finders give false readings — pipes, wires, metal plates, and double-layered drywall all fool electronic finders. Always confirm with a small nail or the magnetic finder before driving a large screw.
- The magnetic finder only finds screws, not stud edges — it tells you a screw is here, not where the stud edge is. Studs are 1.5 inches wide — the screw is somewhere near the center.
- Modern construction varies — studs are not always 16 inches on center. Older homes, remodeled walls, and non-standard framing mean you can’t assume 16-inch spacing.
Buy both: a Studpop or CH Hanson magnetic stud finder (under $15, lasts forever, no batteries) AND a Franklin Sensors ProSensor 710 electronic finder. The Franklin Sensors unit has multiple sensors that show the full stud width simultaneously — far more reliable than single-sensor electronic finders. The magnetic one confirms what the electronic one tells you. Together they cover every situation you’ll encounter.
Finishing and Surface Work Tools
A putty knife is a flat blade on a handle used to apply, smooth, and scrape. The flexibility of the blade determines its use: a flexible blade applies and feathers joint compound, spackle, and wood filler because it bends to the surface contour and spreads material smoothly. A stiff blade scrapes because it holds its shape under force and pops material off the surface without deflecting. The width determines what fits where: 1.5 inches for tight corners and small patches, 3 inches for most repairs, 5–6 inches for applying filler over larger areas and feathering edges. Paired with a heat gun, a stiff putty knife becomes a paint stripper — heat the paint until it bubbles, slide the knife under it, and it lifts off in long strips.
- Filling nail holes and small dents — flexible knife applies spackle flush; let dry, sand, paint
- Applying joint compound over tape and screws — the flexible 6-inch knife feathers the edges flat
- Scraping old paint and putty from window sills and trim — stiff knife plus heat gun removes layers that sanding alone won’t touch
- Removing old caulk from joints — the stiff blade works under the caulk bead and pops it free
- Applying wood filler to damaged trim and furniture — the flexible blade applies and smooths wood filler into voids and gouges
- Opening stuck paint cans — the stiff 3-inch pries the lid without bending it the way a screwdriver does
- Cleaning dried adhesive from floors — the stiff wide blade scrapes dried construction adhesive and flooring adhesive from concrete and wood subfloors
- Removing wallpaper — after soaking, the wide flexible blade slides under the paper and peels it without gouging the drywall beneath
- Flexible blades won’t scrape — trying to scrape with a flexible blade just deflects the blade and leaves the material. Use the stiff blade for scraping, the flexible for applying.
- Cheap blades rust — stainless steel blades are worth the small price difference. A rusted blade leaves rust stains in white spackle and joint compound.
- The handle matters for grip — for older hands, a wider rubber-grip handle reduces the force needed to scrape. Avoid thin metal or plastic handles.
Hyde Tools and Red Devil make reliable sets worth buying new. A 4-piece set covering 1.5”, 3”, and 6” in both flexible and stiff is the practical minimum. Find sets at garage sales — old quality putty knives with stainless blades clean up easily and last indefinitely. Check the blade for rust pitting (not just surface rust, which cleans off) and make sure the blade-to-handle joint is solid with no wobble.
A caulk gun holds a standard 10-ounce caulk tube and uses a ratcheting rod driven by a trigger to push the plunger forward at a controlled rate, extruding caulk through the nozzle in a consistent bead. The trigger controls bead size — more squeeze, more caulk. A smooth-rod (dripless) caulk gun releases trigger pressure to stop the flow; the standard ratchet type requires you to pull the rod back manually. The 5-in-1 painter’s tool is a multi-function scraper with a hook for cleaning paint rollers, a can opener, a nail puller, and a flexible blade for spreading filler. Together these two tools handle nearly every painting, sealing, and finishing prep job in a house.
- Sealing gaps around windows and doors — interior latex caulk seals air gaps; exterior silicone handles weatherproofing
- Sealing plumbing penetrations — where pipes come through walls, floors, and ceilings
- Re-caulking tubs and showers — silicone caulk at the tub-wall joint prevents water infiltration behind tile
- Applying construction adhesive — Liquid Nails and similar adhesives come in caulk gun tubes; same gun, different cartridge
- 5-in-1: cleaning paint rollers — the curved hook scrapes paint out of the roller pile for reuse or disposal
- Temporary surface sealing around fixtures — silicone caulk applied around the outside of a slow leak at a fixture joint or fitting can slow surface seepage while you arrange proper repair. This is cosmetic surface sealing only — not a repair for pressurized pipe leaks. Always have a licensed plumber assess and repair any active plumbing leak.
- Filling gaps in concrete and masonry — polyurethane caulk bonds to masonry and fills cracks that latex caulk won’t bridge
- 5-in-1 as a paint scraper on glass — held flat, the blade scrapes dried paint off windows without scratching
- 5-in-1 as a pry tool for trim — the wide blade spreads force over a larger area than a putty knife for removing thin trim without damage
- Standard caulk guns drip — after you stop squeezing, pressure in the tube continues pushing caulk out. Pull the rod back immediately after each bead or buy a dripless (smooth-rod) gun.
- Silicone caulk cannot be painted — use paintable latex caulk anywhere paint will cover the joint. Pure silicone repels paint permanently.
- Silicone is nearly impossible to remove cleanly — think before you apply it. Latex caulk is easier to remove and re-do.
Dripless smooth-rod caulk gun (Newborn or Red Devil) and a Red Devil 4-in-1 or Hyde 5-in-1 painter’s tool. The dripless gun costs a few dollars more than the standard ratchet type and eliminates wasted caulk and drips on finished surfaces. Keep on hand: a tube of paintable latex caulk for interior trim, a tube of silicone for wet areas, and a tube of polyurethane for exterior and concrete. Three tubes cover 95% of all sealing jobs in a home.
A flat pry bar is a length of hardened steel with a slight curve or rocker at one or both ends and a notch for pulling nails. You slide the thin end under whatever needs to move, position the curved section as a fulcrum against a solid surface, and push or pull the handle end. The lever multiplies your force dramatically — a 10-pound push on an 18-inch handle translates into far more force at the working end than your hands could ever apply directly. The Estwing is forged in one piece in Belleville, Illinois. No welds. No rivets. No joint where the bar meets the handle. The thing that breaks on cheap pry bars — the connection point — does not exist on an Estwing.
- Pulling nails — the notch at the tip hooks under nail heads and the rocker levers them straight out without splitting the wood
- Removing old trim and molding — slide the thin end behind the trim, work along the length, pop it free without damaging the wall
- Prying up flooring — hardwood, tile, vinyl plank — the flat end gets under the first piece and the rest follow
- Opening crates and wooden shipping boxes — the thin end splits the lid at the nail line cleanly
- Moving heavy objects small distances — slide under a refrigerator, washing machine, or cabinet and lever it across the floor without lifting
- Separating stuck or painted-shut doors and windows — the thin end breaks the paint seal without damaging the frame
- Lifting heavy objects onto dollies or casters — pry up one end, slide a furniture coaster under, repeat; no lifting required
- Spreading door frames that have swollen shut — insert the tip and apply steady outward pressure to relieve the bind without removing the door
- Demolition scraping — the flat face scrapes old adhesive, dried caulk, and tile mastic off concrete or subfloor faster than any hand tool
- Aligning bolt holes in heavy brackets — insert the tip in the hole and lever the bracket into alignment while you start the bolt
- It will damage soft surfaces without protection — always place a scrap of wood between the pry bar and any finished surface you want to protect. The rocker concentrates all the force on a small contact point.
- 18 inches is not enough for serious structural work — for moving beams, lifting floor joists, or demolishing walls, a longer wrecking bar (30”+) is the right tool.
- The thin tip can slip — especially on smooth painted surfaces. A sharp tap with a hammer seats the tip firmly before you apply lever force.
The Estwing 18” flat pry bar (model EB-18) is the standard. Forged in Belleville, Illinois, lifetime guarantee, available new or used. Find them at garage sales and estate sales — a used Estwing pry bar is indistinguishable from new because there are no joints to fail and the steel doesn’t wear out. Check the tip: it should be thin and sharp, not mushroomed or bent. The nail notch should be clean and open. Those two things tell you everything about the bar’s condition.
Consumables and Shop Supplies
A hardware variety kit is a sorted collection of the fasteners you actually run out of mid-job. Wood screws in #6, #8, and #10 in multiple lengths. Drywall screws. Sheet metal screws. Common nails. Finishing nails. Hex bolts, nuts, and flat washers in 1/4”, 5/16”, and 3/8”. Eye bolts. Picture hooks. Wall anchors. All sorted into labeled compartments in a plastic organizer box. The point is not to have every fastener ever made — it’s to have the twelve fastener types you need 90% of the time, on hand, organized, so you finish the job instead of driving to the hardware store for one screw.
- Replacing missing screws in furniture and appliances — the right size is in the kit; the job takes two minutes instead of a hardware store trip
- Hanging pictures and mirrors — picture hooks, wall anchors, and the right screw length for the stud are all in one box
- Repairing loose cabinet hinges and drawer slides — slightly larger screw in the same hole fixes a stripped hinge mount in 30 seconds
- Securing outdoor hardware — gate hinges, fence brackets, deck hardware all use 5/16” or 3/8” hex bolts with washers
- Emergency repairs mid-project — when you realize you’re two screws short of finishing a job, the kit has them
- Repairing stripped screw holes — the next size up screw from the kit bites fresh wood and holds; no filler, no dowel, no waiting
- Building temporary jigs and fixtures — having assorted bolts and nuts means you can bolt scrap wood together into a drill guide, clamping jig, or work stop instantly
- Replacing lost hardware on used tools — that garage sale find missing one bolt becomes usable the same day
- Kits get disorganized fast — without discipline, the compartments mix and the kit becomes useless. Label every compartment. Return every unused fastener. Spend two minutes re-sorting after every job.
- No specialty fasteners — concrete anchors, lag screws, structural bolts, and specialty hardware are not in a variety kit. Buy those for specific jobs.
- Quality varies — cheap kits have soft fasteners that strip on first use. Look for kits with hardened screws (zinc or black oxide coating) rather than bright chrome-plated imports.
Look for a kit with at least 500 pieces across 20+ fastener types, in a divided organizer with a secure latch. Hillman, Stanley, and Everbilt make reliable hardware kits sold at home improvement stores. Buy the largest kit that fits your storage space — you will use everything in it over time. Add a cheap label maker (Brother P-Touch) and label every compartment the day you open the kit. That one step determines whether the kit stays useful for 20 years or becomes a junk drawer in six months.
Super glue (cyanoacrylate) is a one-part adhesive that bonds almost instantly when it contacts moisture — including the moisture on most surfaces and the moisture in air. It bonds ceramics, glass, metal, rigid plastics, rubber, and skin. Gel formula stays where you put it instead of running. It creates a rigid bond with almost no gap-filling ability — the surfaces must fit together closely. JB Weld epoxy stick is a two-part putty — a core of one compound wrapped in a sleeve of another. You cut a section, knead it together until the color is uniform, then press it into place. It fills gaps, rebuilds missing material, and sets hard enough to drill, tap, sand, and paint. SteelStik bonds to metal and withstands high heat. KwikWood fills wood and takes paint. MarineWeld works underwater and on wet surfaces. Between the two products, there is almost nothing in a home that cannot be temporarily or permanently repaired.
- Repairing broken ceramics and pottery — super glue bonds porcelain, ceramic tile, and pottery invisibly if the pieces fit cleanly
- Rebuilding stripped screw holes — KwikWood fills the stripped hole, sets hard, and accepts a screw in 20 minutes
- Stopping leaks in metal pipes and fittings — SteelStik seals pinhole leaks and crack leaks in copper, iron, and steel temporarily or permanently
- Reattaching loose trim, molding, and veneer — super glue gel bonds wood-to-wood and wood-to-paint without clamping pressure
- Repairing broken handles and hardware — tool handles, drawer pulls, cabinet knobs — epoxy stick rebuilds what’s missing and holds under load
- Reattaching loose veneer and wood edging — a tiny drop of super glue gel bonds thin wood veneer back to a substrate instantly without clamps or curing time.
- Stopping a stripped bolt from spinning — a tiny drop of super glue between the bolt head and the surface holds it while you tighten the nut from the other side
- Rebuilding missing threads — SteelStik packed into a stripped nut or bolt hole, allowed to partially set, then threaded with the correct bolt, creates a new thread that holds surprisingly well
- Bonding unlike materials — metal to rubber, wood to plastic, ceramic to metal — epoxy stick is nearly the only adhesive that works across all of these combinations
- Super glue bonds skin instantly — and it bonds your fingers together if you’re not careful. Keep acetone (nail polish remover) nearby to dissolve it. Don’t panic — skin naturally releases from super glue bonds within a day or two.
- Super glue has no gap-filling ability — if the pieces don’t fit closely, the bond is weak. For gaps, use epoxy stick.
- Epoxy stick requires thorough kneading — streaks of unmixed material don’t harden. Knead until the color is completely uniform.
- Neither is structural — a repaired load-bearing joint, a cracked frame, or a broken support beam needs proper repair. These products are for non-structural work only.
Super glue gel (Loctite or Gorilla Glue gel formula, not the liquid) plus JB Weld SteelStik and KwikWood sticks. Buy two of each — these products dry out or harden in the package if opened and stored improperly. Keep super glue in a small airtight bag in the refrigerator to extend shelf life. JB Weld sticks last years sealed. MarineWeld is worth adding if you have any outdoor plumbing, boats, or vehicles. Having all three in the shop means almost no repair has to wait for a hardware store trip.
Electrical tape is a vinyl tape with a rubber adhesive rated to insulate wire splices at household voltages (600V for 3M Scotch 88, the professional standard). It stretches to conform to irregular shapes, stays pliable in cold, and doesn’t harden and crack over time the way cheap vinyl tape does. Multiple colors let you mark wires by function — black for hot, white for neutral, green for ground, red for the second hot in 240V circuits — so future repairs start with correct identification instead of guesswork. Small gauge hookup wire (18 AWG to 22 AWG) handles the low-voltage wiring that fails most often in a home: lamp cords, appliance leads, doorbell wire, thermostat wire, speaker wire, and automotive wiring. These two supplies cover probably 80% of all household wiring repairs that don’t require opening a panel.
- Repairing lamp cords and appliance cables — re-splice a broken wire, wrap each conductor separately, then wrap the assembly — lamp works again
- Marking wire function — wrap a band of colored tape at each end of a wire to identify its purpose before pulling it through a wall
- Temporary insulation on splices — when you need the circuit working before you close the wall, electrical tape holds safely until the permanent connection is made
- Wrapping tool handles — a cracked or slippery screwdriver or plier handle gets a layer of electrical tape that improves grip immediately
- Bundling cables — wrap a loop of electrical tape around a cable bundle to keep cords organized without damaging the insulation the way zip ties can
- Temporary thread locker — wrap a few layers of electrical tape over a nut and bolt that keeps vibrating loose — holds until you can get proper Loctite
- Protecting surfaces from tool marks — wrap the jaws of Channellock pliers in electrical tape before gripping a chrome fixture; no marks left on the finish
- Depth marking on drill bits — wrap a band of tape on the bit at the depth you want; stop drilling when the tape reaches the surface
- Emergency zipper pull — a loop of electrical tape threaded through a broken zipper pull works until you can get a replacement
- Electrical tape is not a permanent splice — for permanent wiring inside walls, use wire nuts or push-in connectors. Electrical tape over bare wire is a temporary fix only.
- Cheap tape unravels and loses adhesion — 3M Scotch 33+ and 88 are the standards. The dollar-store version hardens, cracks, and falls off. Buy name brand.
- Small gauge wire has current limits — 22 AWG handles about 1 amp, 18 AWG about 5 amps. Don’t use hookup wire for appliances that draw more than that.
3M Scotch 33+ or 88 in black (two rolls), plus one roll each in red, white, green, and yellow. For wire: 18 AWG in black, white, red, and green — 25 feet of each covers years of repairs. Add a wire stripper that handles 18–30 AWG — the Klein 11055 is the standard. Wire nuts in red and yellow sizes cover most splice sizes. Store it all together in a small labeled bag or box so it’s always in one place when you need it.
The 12-inch flat pry bar is a smaller, more nimble companion to the 18-inch bar. Where the 18-inch is the workhorse, the 12-inch gets into cabinet interiors, between drawer faces and boxes, inside door frames, and anywhere the longer bar is too unwieldy. The Wonder Bar design (flat with a curved nail slot at each end) is particularly versatile because both ends work and neither end has a large head that catches on trim and molding. It fits in a tool belt or apron pocket and comes out ten times a day on any interior work project.
- Opening paint cans — the thin end slides under the lid and levers it up cleanly without bending the lid the way a screwdriver does
- Removing small trim and molding — shoe molding, base cap, door stop — the 12” fits behind pieces the 18” can’t reach
- Pulling small nails and staples — the nail slot at each end captures nail heads and levers them straight out
- Separating glued furniture joints — tap the thin end into the joint and use the bar as a wedge to break the old glue bond
- Removing stubborn staples from wood flooring — the thin tip slides under staple crowns that a regular staple remover can’t reach in tight corners
- Popping up carpet tack strips — slide the tip under the tack strip and lever it up without damaging the subfloor the way a larger bar would
- Adjusting door strike plates — tap the Wonder Bar behind a loose strike plate to shift it slightly without removing it entirely
- Less leverage than the 18” — for anything requiring serious force, use the longer bar. The 12” is for precision, not power.
- Still marks surfaces — always use a scrap of wood as a pad between the bar and any finished surface you want to protect.
Stanley FatMax Wonder Bar (12”) or the Estwing 12” flat bar. Either is the right answer. The Wonder Bar is lighter and more versatile; the Estwing is one-piece forged and more durable. Buy whichever you find first at a fair price — this is a secondary tool and not worth spending a lot on when the 18” Estwing is doing most of the real work.

🏆 The Lifetime Guarantee Brands — Buy Them Used Without Hesitation
These brands honor their lifetime guarantees on used tools with no receipt required. Find them at garage sales, estate sales, pawn shops, Facebook Marketplace, or eBay — the guarantee follows the tool, not the buyer.
Estwing — Belleville, Illinois. Hammers, pry bars, hatchets. Made in USA since 1923.
Channellock — Meadville, Pennsylvania. Pliers. Made in USA since 1886.
Klein Tools — Lincolnshire, Illinois. Pliers, wire cutters, screwdrivers. Made in USA since 1857.
Craftsman — Lifetime guarantee on all hand tools. Replace at any Ace Hardware, Lowe's, or Sears — no receipt, no questions.
Irwin Vise-Grips — Original locking pliers. Lifetime guarantee.
Swanson — Frankfort, Illinois. Speed squares. Made in USA since 1925.
A $3 Craftsman wrench at a garage sale is worth more than a $15 import at a big box store. The guarantee makes it worth more. The quality makes it last longer. The brand makes it easy to replace if anything ever goes wrong.
Print this before you go. Every tool on the Grandfather Toolkit list in one sheet — the brands to look for, exactly what to check, what to avoid, and two checkboxes per tool so you track what you own and what you still need. Never buy the same wrench twice.
“My daughter called at 10 PM on a Sunday night. Her water heater was leaking onto the basement floor. Her husband was out of town. I asked her three questions and told her exactly which shutoff to turn and where it was. Then I drove over with my toolbox and we stopped the leak and had her set up with water again by midnight. She called it a miracle. It was not a miracle. It was a shutoff wrench and forty years of knowing where things are and how they work. That is the whole thing. You are not going to get rich teaching your kids to turn off the water. But you might save them a very bad Sunday night.”
“After the hurricane my neighborhood lost power for eight days. I had a generator, fuel, and extension cords long enough to reach my elderly neighbor next door. She ran her refrigerator and a fan off my generator for six days. My son-in-law came by on day three and looked at what I had set up and said, ‘Dad, how did you know to have all this?’ I told him I had been buying and organizing tools and equipment since before he was born. He stood there looking at the garage and said, ‘I need to start doing this.’ I handed him a generator the following month as an early Christmas present. He cried a little. I let him.”
“My grandchildren are twelve and fourteen. They come over on Saturday mornings and I teach them how things work. How to change a tire. How to read a circuit breaker panel. How to shut off water and gas. How to use a multimeter. Their parents cannot do most of these things. Their school is certainly not teaching them. I have a full workshop and I am teaching two teenagers that a broken thing is just a thing that hasn’t been fixed yet. My grandson fixed his bicycle last month by himself using skills he learned in my garage. He called me to tell me it worked. That call was worth more than any tool in that garage.”
“I am 73 years old and I have never in my adult life called a plumber for something I could fix myself. Not once. When my neighbor’s toilet was running and she was going to call a plumber for a hundred and fifty dollar service call, I walked over with a flapper valve I had in my parts drawer and fixed it in eleven minutes. She tried to pay me. I told her to bring me tomatoes from her garden when they came in. She has brought me tomatoes every August since. I have a drawer full of parts for things that break and the knowledge to use them. That is not magic. That is just paying attention for fifty years.”
Don't forget leather work gloves — buy several pairs now. At 70 your skin thins, tears easily, and heals slowly. A cut at 70 takes three times as long to heal as a cut at 50. Quality leather gloves stored away last decades. Buy them now, keep them in the garage, and wear them every time you work. This is not optional.
💡 Why Power Goes Out — 15 Documented Reasons